First, let me say this is all Heather's fault. I went to her blog to see what she'd been up to lately, and she had a quiz posted that I just had to take. I failed it miserably, and refuse to disclose the results. However, there was another test I did take, and it was hilarious, so I had to share:
$4275.00The Cadaver Calculator - Find out how much your body is worth.
Yep, that's right. I am worth $4275.00 in the Dead Body market. It's good to know these things, don't you think? Go ahead! Take the test yourself and post back your worth. I double-dog-dare you!
Monday, April 28, 2008
Sunday, April 27, 2008
I Will Survive
I was going to call this post I'm Too Old For This, but I obviously changed my mind. Overall, this weekend ended up very good (well?). I spent most of the day on Saturday cutting and packing up ribbon, and heaven knows I have a lot of that! I made up 60 bags of ribbon from my Ribbon Outlet extravaganza...three different types of ribbons all nicely grouped: Twill/Grosgrain, Satin, and Craft Satin. And the really sad part is I have so ... much ... left... un-cut. I thought if I sold all the little bags of ribbon, I'd pay for the gas to today's Yard Sale that was about 60 miles away. Far.
The Yard Sale was good. People lined up outside an hour before opening, and they flowed in and bought, bought, bought! I sold almost all my miscellaneous inks, lots of punches, 16 old catalogs, 22 bags of ribbon, and 17 of my SU stamp sets. Yay!
And every bone in my body hurts. I was on my feet from about 8:30 am until 3:30 pm. Oh, my goodness. I have aches in places I did not know I had places. But was it better than sitting at home? Probably.
So my weekly Farmers Markets start up next weekend, and I am really looking forward to it! If only I had inventory ... guess what I'll be doing this week? Interestingly, some of the stuff I have that did not sell at the Yard Sale (and based on its age may never sell), I thought I just might have to break down and use. USE ... imagine that. Hopefully I'll actually get to that one evening this week, and I'll be sure to show y'all what comes out of that effort. ;-)
Just to show you I have done something this weekend other than cut ribbon:
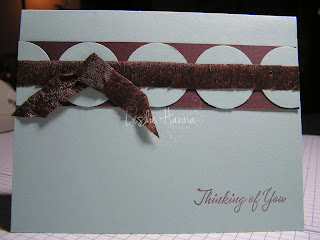
 This is a gift card, totally inspired by the patterned black & red ribbon. I wound up all of my $1 Mike's ribbon I picked up last week, and this one just cried to be used as a cumberbund. For this version, I folded the bottom flap up first, then folded in the sides, and I am faced with a seam. Hmmm ... maybe I'll make some with the flap folded up on the outside to hide the seam. The cumberbund will cover the edge, and all will be well with the world. This would also make a cool card.
Ah, well, I think I'll go fix me some vittles and go to bed early. Vittles? Can you tell I watched many hours of The Beverly Hillbillies yesterday? ;-)
The Yard Sale was good. People lined up outside an hour before opening, and they flowed in and bought, bought, bought! I sold almost all my miscellaneous inks, lots of punches, 16 old catalogs, 22 bags of ribbon, and 17 of my SU stamp sets. Yay!
And every bone in my body hurts. I was on my feet from about 8:30 am until 3:30 pm. Oh, my goodness. I have aches in places I did not know I had places. But was it better than sitting at home? Probably.
So my weekly Farmers Markets start up next weekend, and I am really looking forward to it! If only I had inventory ... guess what I'll be doing this week? Interestingly, some of the stuff I have that did not sell at the Yard Sale (and based on its age may never sell), I thought I just might have to break down and use. USE ... imagine that. Hopefully I'll actually get to that one evening this week, and I'll be sure to show y'all what comes out of that effort. ;-)
Just to show you I have done something this weekend other than cut ribbon:
 This is a gift card, totally inspired by the patterned black & red ribbon. I wound up all of my $1 Mike's ribbon I picked up last week, and this one just cried to be used as a cumberbund. For this version, I folded the bottom flap up first, then folded in the sides, and I am faced with a seam. Hmmm ... maybe I'll make some with the flap folded up on the outside to hide the seam. The cumberbund will cover the edge, and all will be well with the world. This would also make a cool card.
 Ah, well, I think I'll go fix me some vittles and go to bed early. Vittles? Can you tell I watched many hours of The Beverly Hillbillies yesterday? ;-)
Thursday, April 24, 2008
I Am Weak
I have been a bad girl. First I went to Michael's last evening under the guise of purchasing some replacement blades for my Fiskars paper trimmer. After all, when I show you the fuzzy-edged papers I actually used on cards, you will see that this was a desperate move on my part. Also, Mike's is right next door to Pet Smart, and I was there to buy cat food, since the poor girl was almost out. I guess I am a bad Mom, too.
So the first thing I saw as I entered Michael's was a sign announcing all Provo Craft stuff was on sale. This was not a good beginning. I got my replacement blades and also picked up a Cuttlebug die (it was only $5, k?). Then I wandered into the bead section looking for a bag of those Dots (or whatever they are called...half-circle globe things you stick on cards...gems, but not ...) that some people have been talking about on SCS. None found, so I was safe.
Since I was already in the store, it could not hurt to just walk past the $1 Spot, right? So I mosied on over and found a few spools of ribbon (hey, surprise!) that I could probably, maybe use. I did not buy about 30 other spools that were there, so I get 'good girl' credits for that, at least the way I keep score.
Then I wandered over to the regular ribbons, and it went downhill from there. I found a bunch on sale that I selectively culled (is that redundant, since culling is itself a selection process?) ... then I left the store since my hands were full.
Oh, but it gets worse! Today I was enabled by a post on SCS to go look at http://pinkhedgehogpapercrafts.com. Sigh .... Most of their brads match the SU colors, and some were on sale. And I have to tell you (CAUTION: ENABLEMENT ALERT!) they have Antique Brass, and no one else in the world carries these any more as a separate item. If you want 'em, you can get them there. I bought lots.
But the good news is I actually stamped something last night! One of my friends asked if I had any manly cards she could give to people who were leaving - moving on to greener pastures. So first I did a little Industry Research, also known as trolling the SCS gallery for inspiration. I stumbled across this card, and was immediately inspired. So off I went in search of some two-sided manly papers, and here's what I managed to generate in a few short hours:
 This first one uses a piece of double-sided paper from my stash. The sentiment is from Papertrey Ink, and I think I have gotten my money's worth out of this words set. They are small and very useful for tag-like applications like this one. And I used this sentiment on every stinkin' card I made last night, too.
I even used some of my Ribbon Outlet hoard, even though it was less than a yard's worth. This one actually matched the River Rock card stock I used as the base. I had to put the other 99+ yards back in the closet for another day, though. Sigh.
Then I decided to try the paper strips thing using a manly color like blue. Please take note of the fuzzy edges of each and every piece of DS paper in this next card. I could call it a distressed look, and say I meant to do that, but in truth, I just needed a new blade for my cutter. Look closely. No, go ahead! I deserve any ridicule you throw my way, really!
 There is an almost funny story with this card. I was so proud of myself that I was actually using the Stampin' Up! DS papers I had to have when they first came out, and that I also had all the matching ribbon (well, du-uh), this card would just be a cinch. Not. After I had all the strips of paper stuck on to the card base, I went in search of the Blue Bayou double-stitched ribbon. I looked and looked and looked and then I looked some more. I swear I have all of these, and I have used all of them, but for the life of me I could not find this one. I found all of the others, but not this one. Sigh... what to do, what to do. I wanted to put on a piece of the blue and layer some of the skinny twill I got at the Ribbon Outlet, but it was not to be. And can you believe I went through my whole box of nicely-wound-on-clothespins blue ribbon and not ONE of them matched this card stock? Grrrr.
Then it hit me: Use a strip of the card stock as a layer. But of course! Then I used SU white grosgrain and called it done.
Then I decided to use up some more of my Papertrey Ink stuff, and I made these.
 The ribbon on this one is the PTI twill, and I am in love. I fondled it a lot, and it broke my heart to use it.
 Here's another variation on the same theme.

And another.
My friend bought three of them, and the rest will go into my bin for my Farmers Markets that begin on the 3rd. Yay. Inventory at this time of year is a good thing.
And just to show you am capable of making a Mother's Day card that is not pink, here is one in yellow:
 Usin' up some of my SU Ribbon Originals ribbons, here. I like how this yellow one looks on the So Safron card stock. I added the green velvet (sooooft) for contrast and stamped the much-used sentiment in Mellow Moss.
I actually did stamp that image from Fabulous Flowers three times with white craft ink on So Saffron card stock, then heat-embossed them, cut them out, cut them up and layered things. I like the look, but honestly, I do not think I will make too many of these, so please appreciate it while you can. I thank you.
Oh, and this Sunday I will be one of the vendors at the 4th Annual Virginia Scrapbooking & Craft INDOOR Yard Sale. When: Sunday, April 27, 2008. Where: Indoors in the Main Commerical Hall at the Prince William County Fairgrounds in Manassas, Virginia. Time: 9:30am - 4pm. *** RAIN OR SHINE *** --> PLEASE COME BUY MY STUFF!!! Time permitting, I may even make up some grab-bags of all that RIBBON I have so I can sell it to help pay for my table fee. ;-)
So the first thing I saw as I entered Michael's was a sign announcing all Provo Craft stuff was on sale. This was not a good beginning. I got my replacement blades and also picked up a Cuttlebug die (it was only $5, k?). Then I wandered into the bead section looking for a bag of those Dots (or whatever they are called...half-circle globe things you stick on cards...gems, but not ...) that some people have been talking about on SCS. None found, so I was safe.
Since I was already in the store, it could not hurt to just walk past the $1 Spot, right? So I mosied on over and found a few spools of ribbon (hey, surprise!) that I could probably, maybe use. I did not buy about 30 other spools that were there, so I get 'good girl' credits for that, at least the way I keep score.
Then I wandered over to the regular ribbons, and it went downhill from there. I found a bunch on sale that I selectively culled (is that redundant, since culling is itself a selection process?) ... then I left the store since my hands were full.
Oh, but it gets worse! Today I was enabled by a post on SCS to go look at http://pinkhedgehogpapercrafts.com. Sigh .... Most of their brads match the SU colors, and some were on sale. And I have to tell you (CAUTION: ENABLEMENT ALERT!) they have Antique Brass, and no one else in the world carries these any more as a separate item. If you want 'em, you can get them there. I bought lots.
But the good news is I actually stamped something last night! One of my friends asked if I had any manly cards she could give to people who were leaving - moving on to greener pastures. So first I did a little Industry Research, also known as trolling the SCS gallery for inspiration. I stumbled across this card, and was immediately inspired. So off I went in search of some two-sided manly papers, and here's what I managed to generate in a few short hours:
 This first one uses a piece of double-sided paper from my stash. The sentiment is from Papertrey Ink, and I think I have gotten my money's worth out of this words set. They are small and very useful for tag-like applications like this one. And I used this sentiment on every stinkin' card I made last night, too.
 I even used some of my Ribbon Outlet hoard, even though it was less than a yard's worth. This one actually matched the River Rock card stock I used as the base. I had to put the other 99+ yards back in the closet for another day, though. Sigh.
Then I decided to try the paper strips thing using a manly color like blue. Please take note of the fuzzy edges of each and every piece of DS paper in this next card. I could call it a distressed look, and say I meant to do that, but in truth, I just needed a new blade for my cutter. Look closely. No, go ahead! I deserve any ridicule you throw my way, really!
 There is an almost funny story with this card. I was so proud of myself that I was actually using the Stampin' Up! DS papers I had to have when they first came out, and that I also had all the matching ribbon (well, du-uh), this card would just be a cinch. Not. After I had all the strips of paper stuck on to the card base, I went in search of the Blue Bayou double-stitched ribbon. I looked and looked and looked and then I looked some more. I swear I have all of these, and I have used all of them, but for the life of me I could not find this one. I found all of the others, but not this one. Sigh... what to do, what to do. I wanted to put on a piece of the blue and layer some of the skinny twill I got at the Ribbon Outlet, but it was not to be. And can you believe I went through my whole box of nicely-wound-on-clothespins blue ribbon and not ONE of them matched this card stock? Grrrr.
Then it hit me: Use a strip of the card stock as a layer. But of course! Then I used SU white grosgrain and called it done.
Then I decided to use up some more of my Papertrey Ink stuff, and I made these.
 The ribbon on this one is the PTI twill, and I am in love. I fondled it a lot, and it broke my heart to use it.
  Here's another variation on the same theme.
And another.
My friend bought three of them, and the rest will go into my bin for my Farmers Markets that begin on the 3rd. Yay. Inventory at this time of year is a good thing.
And just to show you am capable of making a Mother's Day card that is not pink, here is one in yellow:
 Usin' up some of my SU Ribbon Originals ribbons, here. I like how this yellow one looks on the So Safron card stock. I added the green velvet (sooooft) for contrast and stamped the much-used sentiment in Mellow Moss.
I actually did stamp that image from Fabulous Flowers three times with white craft ink on So Saffron card stock, then heat-embossed them, cut them out, cut them up and layered things. I like the look, but honestly, I do not think I will make too many of these, so please appreciate it while you can. I thank you.
Oh, and this Sunday I will be one of the vendors at the 4th Annual Virginia Scrapbooking & Craft INDOOR Yard Sale. When: Sunday, April 27, 2008. Where: Indoors in the Main Commerical Hall at the Prince William County Fairgrounds in Manassas, Virginia. Time: 9:30am - 4pm. *** RAIN OR SHINE *** --> PLEASE COME BUY MY STUFF!!! Time permitting, I may even make up some grab-bags of all that RIBBON I have so I can sell it to help pay for my table fee. ;-)
Tuesday, April 22, 2008
Happy Earth Day!
Happy Earth Day everyone! So what did you do today to help the earth? I planted moss. On purpose. No, really. While most normal people would be pulling this stuff OUT of the cracks in their sidewalks, I decided to put some IN. And a friend of mine who lives in the woods and has a lot of moss offerred to bring some over some time. Well guess who showed up this evening, armed with three, large zip-top bags full of moss? We went right out back and got to work!
I have a flagstone patio that is at least as large as a postage stamp. Okay, maybe it is about 10x10. I also have a tree that is beautiful, and each year it shades more and more of the yard. I already do not get enough sun to grow tomatoes, so I've been pondering shade-loving plants. Like moss.
These flagstones are really large, and there is this ashy, gravelly stuff between the stones. Some of it washes away over time, which is another reason I was thinking: moss.
We took out the proper tools one would use to loosen the ashy, gravelly stuff: plastic forks, and set to work. Here is a shot of a few carefully-placed pieces of moss:
 It was a highly complex process. Scratch the gravel to loosen it, gently rip off a piece of moss, place in loosened gravel, and mash it down with your hand. Very scientific.
We made quick work of the three bags and admired our progress. It was lovely.

My dream is this will take root and grow to fill in all the spaces between the stones. I also gave her the bags back to refill. She'll be back. I am also going to stop by the local nursery and look for some Lemon Thyme to fill in other parts of the patio. That will smell amazing!
And the plastic forks? Into the dishwasher. They are good plastic forks (my finest) and will be reused...not to worry. I would never throw out plastic forks on Earth Day. Maybe tomorrow, but not today.
Sunday, April 20, 2008
Lazy, Rainy Day, or The Evolution of a Card
Yesterday was GORgeous. Sunny, put-down-the-rag-top gorgeous. I went to a Pot Luck dinner with some friends, over-ate, stayed out too late, took too much of the leftovers, got home and went to bed. I woke up this morning to torrential rain accompanied by thunder and lightening. So after I got up and brushed my teeth, I did something I almost never do: I went back to bed. There are two major reasons I never go back to bed. (1) The second time I wake up, the day is half-gone. I am one of those people at the grocery store at 7:30 am on a Sunday. I get all my errands run and still have half the day left. But if I sleep in, it is mid-morning and I wake up behind schedule, and my life is stressful enough without all this added pressure. And (2) I have really, really - really - weird dreams. Like people from one part of my past life get mixed up in a current event. Or I find myself shopping for clothes, which I never do, and looking for a hook at work in my cube to hang them up. And I guess I bought the clothes in the wedding department or something. And they were nothing I'd be caught dead wearing. See - really weird.
So I got up, showered to wake up, and stamped. I love a good stampin' day!
Following is what came out of my lazy-day efforts.
 First up is a card I finally made with one of my shaving cream papers. This one uses Night Of Navy reinker, and I like how it came out. Not sure I like the card I made with it, but I like the shaving cream background part.
I also made one where I added some Real Red to it, but it came out too garish and I decided to save your eyes from the result. I am still trying to figure out how to mix the reinker into the shaving cream and not have it change colors, like the Real Red turned part of the shaving cream pink. Still learning ...
Recipe: Stamps - All Holiday; Paper - Kraft (or maybe it's Confetti Tan), Night of Navy, Whisper White, Baroque Burgundy; Ink - Night of Navy and Baroque Burgundy markers, Night of Navy reinker; Other - Prep Ribbon Originals, non-SU brads, shaving cream.

I saw the opportunity to use up some of the SU ribbon that came with the Flirty Ribbon Originals, but decided it matched the paper too well, and was not enough of a contrast. I also decided with the stamped background and the Cuttlebug embossing, it was so busy that if I added a sentiment (layered, of course), it might explode, so I set it aside. And looked at it.
 Here is a close-up of the image, mostly because I think close-ups are fun, and also because the Cuttlebug'd background-stamped card is very cool. I'm thinking this folder will work well for a Wedding card. White-on-White-like.
Oh, I used my Fiskars rotary cutter to make the scalloped edge. I tried my corner rounder punch, but it started to become work, and I was too lazy to continue. So out came the rotary cutter and the fancy blade. Tools are my friend.
 But then I moved on. This version of the above card is on white card stock since I managed to Cuttlebug the front of it upside down, and had to cut the pink card apart to save the front. I left off the white strip and used Regal Rose ribbon for contrast.
Without that strip of white to add busy-ness (I spelled it that way on purpose, since 'business' did not read quite right), I felt I could add the layered sentiment without overloading the card. I stamped the sentiment in Regal Rose and added a background layer of card stock, also of Regal Rose. Since it matches the ribbon I think it all came together nicely. I am still missing the white strip, but I think the pattern stamped with the sentiment helps out a little.
 Then I made some without the Cuttlebug. I think the 'bug adds a neat element, but I felt way more comfortable adding things without making the card feel like it had too much going on.
For this one I went back to the matching ribbon, hoping I would start to like it, but I still think it is too light - not enough contrast.
I also left the Regal Rose layer under the sentiment plain instead of edging it like the white layer.
 This one I think came out the best. It has the white layer under the darker ribbon, and I think it is just the right mix.
Recipe: Stamps - All Holidays, Bitty Blossoms bg; Paper - Pretty In Pink, Whisper White, Regal Rose; Ink - Pretty In Pink, Regal Rose; Other - Regal Rose wide gg ribbon, Fiskars rotary cutter.
 Here's basically the same card in Groovy Guava. I used this piece of ribbon from the Sherbet Ribbon Originals...I am not sure if it is a Groovy Guava color or not (I was too lazy to go look it up), but I think it goes very well.
I messed with the sentiment layers for a while until I ended up with the rounded corners and the stamped white layer underneath. It still needed something, so I hunted through my brad stash and found these stars that are almost a perfect color match. It might have been better if they were flowers, or round, but on some level I think being different works for me.
I could probably make SU-colored brads by mixing reinker in some Crystal Effects and putting it on a gold brad, but I did not think of that until I was done, and in my world there is no taking apart and doing over. I'll remember that little trick for next time, as I am sure there will be a next time. ;-)
Recipe: Stamps - All Holidays, Bitty Blossoms bg; Paper - Groovy Guava, Whisper White; Ink - Groovy Guava; Other - Sherbet Ribbon Originals, Fiskars rotary cutter, misc brads.
 Then I got really crazy and used one of the Cuttlebug dies I have. Used it, can you imagine?
So I got up, showered to wake up, and stamped. I love a good stampin' day!
Following is what came out of my lazy-day efforts.
 First up is a card I finally made with one of my shaving cream papers. This one uses Night Of Navy reinker, and I like how it came out. Not sure I like the card I made with it, but I like the shaving cream background part.
I also made one where I added some Real Red to it, but it came out too garish and I decided to save your eyes from the result. I am still trying to figure out how to mix the reinker into the shaving cream and not have it change colors, like the Real Red turned part of the shaving cream pink. Still learning ...
Recipe: Stamps - All Holiday; Paper - Kraft (or maybe it's Confetti Tan), Night of Navy, Whisper White, Baroque Burgundy; Ink - Night of Navy and Baroque Burgundy markers, Night of Navy reinker; Other - Prep Ribbon Originals, non-SU brads, shaving cream.
Then I saw this card on SCS, and was inspired. I started out strong, then backed off. This is the part I refer to as The Evolution Of A Card. When I do my Farmers Markets and craft shows, people always ask me how long it takes me to make a card. That is a tough question to answer. The design is the tough part. That could take me a few minutes to a few days. Or weeks. And even if I think I know what I want to do, it does not always come out like it thought it would, so I keep changing it until I like it enough to replicate. Then it only takes a few minutes to make more of them. Like this card. I mean c'mon, I was CASEing it, fer goodness sake, and it still took me all day.

This was my first pass. I used a different background stamp and different Cuttlebug folder, but tried to follow her idea. I liked her flower, but the idea of stamping and embossing that bugger three times and cutting them all out to make each card made me tired, so I opted to not do the flower. I am basically lazy, you see.
I saw the opportunity to use up some of the SU ribbon that came with the Flirty Ribbon Originals, but decided it matched the paper too well, and was not enough of a contrast. I also decided with the stamped background and the Cuttlebug embossing, it was so busy that if I added a sentiment (layered, of course), it might explode, so I set it aside. And looked at it.
 Here is a close-up of the image, mostly because I think close-ups are fun, and also because the Cuttlebug'd background-stamped card is very cool. I'm thinking this folder will work well for a Wedding card. White-on-White-like.
 Oh, I used my Fiskars rotary cutter to make the scalloped edge. I tried my corner rounder punch, but it started to become work, and I was too lazy to continue. So out came the rotary cutter and the fancy blade. Tools are my friend.
 But then I moved on. This version of the above card is on white card stock since I managed to Cuttlebug the front of it upside down, and had to cut the pink card apart to save the front. I left off the white strip and used Regal Rose ribbon for contrast.
 Without that strip of white to add busy-ness (I spelled it that way on purpose, since 'business' did not read quite right), I felt I could add the layered sentiment without overloading the card. I stamped the sentiment in Regal Rose and added a background layer of card stock, also of Regal Rose. Since it matches the ribbon I think it all came together nicely. I am still missing the white strip, but I think the pattern stamped with the sentiment helps out a little.
 Then I made some without the Cuttlebug. I think the 'bug adds a neat element, but I felt way more comfortable adding things without making the card feel like it had too much going on.
For this one I went back to the matching ribbon, hoping I would start to like it, but I still think it is too light - not enough contrast.
I also left the Regal Rose layer under the sentiment plain instead of edging it like the white layer.
 This one I think came out the best. It has the white layer under the darker ribbon, and I think it is just the right mix.
Then I thought if I saw one more piece of pink anything, I'd heave, so I moved on to Guava. Arguably still very close to pink, but enough orangier (I just made up that word) to settle my stomach.
Recipe: Stamps - All Holidays, Bitty Blossoms bg; Paper - Pretty In Pink, Whisper White, Regal Rose; Ink - Pretty In Pink, Regal Rose; Other - Regal Rose wide gg ribbon, Fiskars rotary cutter.
 Here's basically the same card in Groovy Guava. I used this piece of ribbon from the Sherbet Ribbon Originals...I am not sure if it is a Groovy Guava color or not (I was too lazy to go look it up), but I think it goes very well.
I messed with the sentiment layers for a while until I ended up with the rounded corners and the stamped white layer underneath. It still needed something, so I hunted through my brad stash and found these stars that are almost a perfect color match. It might have been better if they were flowers, or round, but on some level I think being different works for me.
I could probably make SU-colored brads by mixing reinker in some Crystal Effects and putting it on a gold brad, but I did not think of that until I was done, and in my world there is no taking apart and doing over. I'll remember that little trick for next time, as I am sure there will be a next time. ;-)
Recipe: Stamps - All Holidays, Bitty Blossoms bg; Paper - Groovy Guava, Whisper White; Ink - Groovy Guava; Other - Sherbet Ribbon Originals, Fiskars rotary cutter, misc brads.
 Then I got really crazy and used one of the Cuttlebug dies I have. Used it, can you imagine?
I started with the card stock and just the piece of Guava ribbon, with the flowers laying on the card loose until I figured out what to do with them.
Then it morphed from there. I added the scrap of patterned Guava paper to the top of the card, and the piece of twill from my 500+ yard stash from my Ribbon Outlet Field Trip.
Sticking the flowers on was a bit of a challenge, since the middle pieces would not stay in. I ended up cutting tiny strips of scrap and gluing them to the back of the flowers as a brace for support. Even then, when I stuck on the Dimensional, the white part wanted to separate, so No Fondling!
The bottom of the card is left plain with just the sentiment stamped on it. Of all the cards I made today, this one may be my favorite. Now if I could just get out of this pink groove I seem to be in ....
I think I will put away all this pink and move on to maybe some more striped cards using patterned papers - like Yellow. Or Green. But not pink.Saturday, April 19, 2008
Variations On A Theme, times 2
When I start out making a card, part of me wants it to be all Stampin' Up! products. This is largely due to the fact that I am always scrambling at the last minute to have five projects for my workshops, and if I can get that effort out of the way early ... well, sometimes it happens, but most of the time not.
I stumbled upon a card while surfing the SCS gallery this morning, and it reminded me I had some stamp sets still unmounted and neglected, so I mounted two of them and used them. The choice of color for these next two cards is no accident - they were already out, so I used them instead of having them be the beginnings of my pile-o-stuff that will need to be moved 3 weeks from now.
 This card has the Floral bg stamped in Versamark on it, but it is tough to see with my seriously lacking photographic skills. I wanted to use the Delphinium ribbon for a closer color match, but it is retired, of course, so I used the Eggplant instead. I punched a Horizontal Slot in the front of the card to tie the ribbon through (through which to tie the ribbon), just to be different.
I went over the purple petals with a Versamarker and clear-embossed them, just for a little something extra.
 This one I'm not likin' so much. I think these are just not my colors. Or something. First I forgot to ink up one of the circles of dots on the image, so I broke out my Boho Blossoms punch and covered that white space with a flower. I used the extra flowers as tone-on-tone embellishments, and added a bit of purple stickles to their centers because they were so boring. Did I already say I did not like this one so much?
 Here is a close-up of the ribbons. The bottom layer is almost completely obliterated by the two ribbons on top of it. That bottom ribbon is a piece of what I am using (giving away) for my Candy With A Catch Challenge. The bottom ribbon and the Teal ribbons are from my Ribbon Outlet Field Trip, and the purple is SU Eggplant.
That's all for now. I am supposed to be making something in the starch category for tonight's Pot Luck dinner, and I have not even been to the store yet. Guess I'd better get my rear in gear and get moving. I really do have big plans to use those shaving-creamed papers some time soon. If I do not, I'll have to put away all the lovely Red, White & Blue ribbon, and heaven knows I do not want to do that!
I stumbled upon a card while surfing the SCS gallery this morning, and it reminded me I had some stamp sets still unmounted and neglected, so I mounted two of them and used them. The choice of color for these next two cards is no accident - they were already out, so I used them instead of having them be the beginnings of my pile-o-stuff that will need to be moved 3 weeks from now.
 This card has the Floral bg stamped in Versamark on it, but it is tough to see with my seriously lacking photographic skills. I wanted to use the Delphinium ribbon for a closer color match, but it is retired, of course, so I used the Eggplant instead. I punched a Horizontal Slot in the front of the card to tie the ribbon through (through which to tie the ribbon), just to be different.
I went over the purple petals with a Versamarker and clear-embossed them, just for a little something extra.
 This one I'm not likin' so much. I think these are just not my colors. Or something. First I forgot to ink up one of the circles of dots on the image, so I broke out my Boho Blossoms punch and covered that white space with a flower. I used the extra flowers as tone-on-tone embellishments, and added a bit of purple stickles to their centers because they were so boring. Did I already say I did not like this one so much?
 Here is a close-up of the ribbons. The bottom layer is almost completely obliterated by the two ribbons on top of it. That bottom ribbon is a piece of what I am using (giving away) for my Candy With A Catch Challenge. The bottom ribbon and the Teal ribbons are from my Ribbon Outlet Field Trip, and the purple is SU Eggplant.
Recipe for all of the above cards: Stamps - Friendly Flowers, One of a Kind; Paper - Taken With Teal, Lovely Lilac, Whisper White; Ink - Teal and Lilac markers, Versamark; Other - Boho Blossoms punch, Ticket Corner punch, purple Stickles, Eggplant gg ribbon, Offray Outlet ribbon, Rhinestone brads, Horizontal Slot punch.
These next two cards are (obviously) Birthday cards. I used the SU Afternoon Tea DS papers, which I love, love, love! The idea for using strips of many coordinating papers together came from Nichole Heady's blog entry. This one is the more feminine of the two, and will be for one of my customers who has an April birthday. I used more of the flowery sides of the papers for her card.
Can you tell I am totally enamored with the layered ribbon idea? The brown satin is from the Theater Ribbon Originals.
The sentiment is from one of the SU Simply Sent kits.  This is the more masculine version of the same card. I used more of the stripes and patterns, and mostly skipped the froo-froo patterns.
These two cards came together fairly quickly. And if I had not already used the Afternoon Tea papers in my last two workshops, I'd put this one in my lineup and have everyone make this card next month. Of course I'd have them cut their own strips of paper, since that is a lot of cutting, and I might go postal or something if I had to do all of them for the kits. ;-)
Recipe for the above two cards: Stamps - from the Three Thoughts Simply Sent Kit; Paper - Soft Sky, Whisper White, Groovy Guava, Afternoon Tea DS paper; Ink - Groovy Guava; Other - Ticket Corner punch, Theater Ribbon Originals, Groovy Guava double-stitched ribbon, white gel pen.
That's all for now. I am supposed to be making something in the starch category for tonight's Pot Luck dinner, and I have not even been to the store yet. Guess I'd better get my rear in gear and get moving. I really do have big plans to use those shaving-creamed papers some time soon. If I do not, I'll have to put away all the lovely Red, White & Blue ribbon, and heaven knows I do not want to do that!
Friday, April 18, 2008
Ribbon Challenge Update
I just posted my first two attempts with the ribbon for my Candy With A Catch Challenge. Go check it out and let me know if you'd like to play along!
I am also playing with Shaving Cream. Yep - it's out, so I'm playing with it. I have a few things part-way done, so hopefully I'll get to them this weekend. Hint: My Really Reasonable Ribbon Club shipment this month was Red, White & Blue. :-)
I am also playing with Shaving Cream. Yep - it's out, so I'm playing with it. I have a few things part-way done, so hopefully I'll get to them this weekend. Hint: My Really Reasonable Ribbon Club shipment this month was Red, White & Blue. :-)
Wednesday, April 16, 2008
Who'da Thunk?
My brother forwards me interesting tidbits once in a while, and I find them facinating, so I thought I'd share. Yeah, yeah, I know, I should be stampin' something, and actually I am, but I am not ready to share yet. Though I did send out the ribbon pieces to the first two participants in my Candy With A Catch Challenge. I look forward to seeing what you create with it! And if you are one of my blogless readers, you can email me a photo and I'll post it here for you.
Now for the Who'da Thunk Du Jour:
RAILROADS
Does the statement, 'We've always done it like that' ring any bells?
The US standard railroad gauge (distance between the rails) is 4 feet, 8.5 inches. That's an exceedingly odd number. Why was that gauge used? Because that's the way they built them in England, and English expatriates built the US Railroads.
Why did the English build them like that? Because the first rail lines were built by the same people who built the pre-railroad tramways, and that's the gauge they used.
Why did they use that gauge then? Because the people who built the tramways used the same jigs and tools that they used for building wagons, which used that wheel spacing.
Okay, why did the wagons have that particular odd wheel spacing? Well, if they tried to use any other spacing, the wagon wheels would break on some of the old, long distance roads in England, because that's the spacing of the wheel ruts.
So who built those old rutted roads? Imperial Rome built the first long distance roads in Europe (and England) for their legions, and the roads have been used ever since.
And the ruts in the roads? Roman war chariots formed the initial ruts, which everyone else had to match for fear of destroying their wagon wheels. Since the chariots were made for Imperial Rome, they were all alike in the matter of wheel spacing.
The United States standard railroad gauge of 4 feet, 8.5 inches is derived from the original specifications for an Imperial Roman war chariot. And bureaucracies live forever. So the next time you are handed a specification and wonder what horse's ass came up with it, you may be exactly right, because the Imperial Roman Army Chariots were made just wide enough to accommodate the back ends of two war horses.
Now, the twist to the story:
When you see a Space Shuttle sitting on its launch pad, there are two big booster rockets attached to the sides of the main fuel tank. These are solid rocket boosters or SRBs. The SRBs are made by Thiokol at their factory at Utah. The engineers who designed the SRBs would have preferred to make them a bit fatter, but the SRBs had to be shipped by train from the factory to the launch site. The railroad line from the factory happens to run through a tunnel in the mountains. The SRBs had to fit through that tunnel. The tunnel is slightly wider than the railroad track, and the railroad track, as you now know, is about as wide as two horses' behinds.
So, a major Space Shuttle design feature of what is arguably the world's most advanced transportation system was determined over two thousand years ago by the width of a horse's ass.
And you thought being a HORSE'S ASS wasn't important!
Tuesday, April 15, 2008
A Word Of Advice
When the jar of Jerk Seasoning says to use one teaspoon of sauce per pound of meat, believe them. Follow the instructions. Do not use more because it looks like one teaspoon could not possibly coat all of that chicken. That stuff is hot. And water does not help. Neither does an icy Margarita. Ask me how I know.
Sunday, April 13, 2008
Ribbon Outlet Fallout
Man, where did the weekend go?! It's funny how time flies when you have things to do!
As I cleaned on Friday and Saturday in an attempt to find the tops of my tables and set up for my workshops, I decided to actually use the s-crap instead of just collecting it into a pile and moving it to a different surface for "temporary" storage (we all know how that goes ...). In the process I found a piece of this purple paper that I'd used a week or so ago, and it was the perfect size for two cards.

I also used (USED!) two (TWO!) of the new ribbons from my Outlet Field Trip. Amazing, but true!
 Here's a closeup of the tag and the two ribbons. Not too bad considering I threw both of these cards together in about 7 minutes. I was pretty proud of the fact that I thought to use a green ribbon on a purple card, but it needed something, and heaven knows I have a lot of green ribbon.
That piece of skinny twill is off one of the huge rolls I got that resembles a cable spool - the kind we used to make coffee tables out of in college - that will undoubtedly last me a lifetime, or two.
Then there was this one:
 Heather had discovered a small spool of very cool ribbon in one of the bins, and it (the ribbon, not the bin) inspired me to make this, sans ribbon, since we only found one of the spools. In my memory of it (hey, it had been a whole 6 hours since I'd seen it, c'mon!) it was a very dark brown background with large mint or aqua circles on it. I thought I could re-create the look by putting circles on a strip of card stock the same width as the circles.
Moving on to Saturday, the Yard Sale went well. I got the tent set up with a little help, then I helped several other people set up their tents - it was only fair! I think I discovered muscles I did not know I had, but it was good practice for when I need to set up my tent every Saturday starting in May. If only that bit of exercise counted for anything ...
It had dumped rain big-time Friday night, so we set up around the puddles in the parking lot. It threatened to rain most of the morning, but thankfully it held off and actually got sunny and hot by the afternoon. Results-wise, I took in about 2/3 of what I sold at last year's Yard Sale, and I only managed to move about one box of goods. However, I met four ladies along the way who expressed an interest in coming to my classes, so that was an unexpected bonus!
I also heard about a huge (huge) Scrapbook Yard Sale in two weeks in Virginia that I am trying to get into, though I fear with only two weeks to go, tables will no longer be available. Maybe I can register now for next year! :-)
Don't forget about my Blog Candy With A Catch! Check it out and play along! For those who have already responded, I will get your ribbon pieces out in the mail shortly.
As I cleaned on Friday and Saturday in an attempt to find the tops of my tables and set up for my workshops, I decided to actually use the s-crap instead of just collecting it into a pile and moving it to a different surface for "temporary" storage (we all know how that goes ...). In the process I found a piece of this purple paper that I'd used a week or so ago, and it was the perfect size for two cards.

I also used (USED!) two (TWO!) of the new ribbons from my Outlet Field Trip. Amazing, but true!
 Here's a closeup of the tag and the two ribbons. Not too bad considering I threw both of these cards together in about 7 minutes. I was pretty proud of the fact that I thought to use a green ribbon on a purple card, but it needed something, and heaven knows I have a lot of green ribbon.
That piece of skinny twill is off one of the huge rolls I got that resembles a cable spool - the kind we used to make coffee tables out of in college - that will undoubtedly last me a lifetime, or two.
Then there was this one:
Heather had discovered a small spool of very cool ribbon in one of the bins, and it (the ribbon, not the bin) inspired me to make this, sans ribbon, since we only found one of the spools. In my memory of it (hey, it had been a whole 6 hours since I'd seen it, c'mon!) it was a very dark brown background with large mint or aqua circles on it. I thought I could re-create the look by putting circles on a strip of card stock the same width as the circles. I used a piece of the Papertrey Aqua paper (that's one less piece I have to put away!) and a scrap of Chocolate Chip from which I managed to salvage a 5 1/2"-wide piece. After I made the row of circles, I sat there and looked at it as I usually do - stumped for what to do next. Since I was supposed to be cleaning, I could not leave it out to think about it, so I remembered a very weird roll of ribbon I'd picked up on our trek and I pulled it out. Turns out it was very narrow crepe paper, not ribbon at all. Oh, well, what the heck - I used it, and I think it looks fine! I slapped on a simple sentiment, and called it done. Boring, but done. 
Here is a close-up of the crepe paper ribbon. You cannot really tie a bow with it (mine was just a half-tie), but it is definitely different. And I have a lot of it.....
(I know, my circle punch needs to be sharpened ... it is on my list of things to do...)
Moving on to Saturday, the Yard Sale went well. I got the tent set up with a little help, then I helped several other people set up their tents - it was only fair! I think I discovered muscles I did not know I had, but it was good practice for when I need to set up my tent every Saturday starting in May. If only that bit of exercise counted for anything ...
It had dumped rain big-time Friday night, so we set up around the puddles in the parking lot. It threatened to rain most of the morning, but thankfully it held off and actually got sunny and hot by the afternoon. Results-wise, I took in about 2/3 of what I sold at last year's Yard Sale, and I only managed to move about one box of goods. However, I met four ladies along the way who expressed an interest in coming to my classes, so that was an unexpected bonus!
I also heard about a huge (huge) Scrapbook Yard Sale in two weeks in Virginia that I am trying to get into, though I fear with only two weeks to go, tables will no longer be available. Maybe I can register now for next year! :-)
After I got home, I was totally garaged and all I wanted to do was lay down and take a nap. But I still had tables to clean and kits to cut and prep and I think I had a sinus infection or a really good cold brewing and I felt feverish and ... and all I wanted to do was go to bed. But the prospect of getting up early to clean and set up was worse than having to finish, so I am happy to say I did get it all done last night and I slept very soundly and woke up feeling a little better, thank you very much.
Today's classes went well. I only heard, "Oh, I meant to do that" a few times, we salvaged all of the crises, and the shaving cream was a total hit. I love it when I can provide some entertainment at a stamping event. ;-)
But right now I wish I were a cat so I could do this: She usually assumes this position during the workshop, denying a stamper her seat at a station. At least this evening she waited until everyone was done before she took ownership of the chair. I promise you she will be there until bed time, at which time she will wake up to go to bed. Life's tough, isn't it?
Don't forget about my Blog Candy With A Catch! Check it out and play along! For those who have already responded, I will get your ribbon pieces out in the mail shortly.
Friday, April 11, 2008
A New Kind Of Challenge - Candy With A Catch
Here's my idea: Since I have SO MUCH RIBBON now (see why in my previous post), instead of pure Blog Candy where I'd just plain give it away, I'd like to send you a piece of a particular ribbon with the challenge to make a card using that ribbon. Then you'll come back here and post a comment with a link to your card to show us all what you did. I think it would be very cool to see what each of you does within your own style of stamping given the same item as a starting point. Kind of like an inspiration challenge, except instead of a picture, you'll actually receive something to use. If you are a Scrapbooker or a 3-D sort of person, feel free to make something else instead of a card. I'm all for equal-opportunity, here!!!
I was just thinking - this is like Reverse Blog Candy! Instead of posting a comment and winning ribbon, you will all get the ribbon, but you have to USE it and post back!
Some of my ribbons are very wide, some have wild patterns, some have cool textures - you just never know which one I might pick!
There is only one rule: You must use at least part of the piece of ribbon on your card or item of choice. Other than that, it's an open field.
If you want to try this, please email me at lqhanna@gmail.com with your snail-mail address so I can mail you your ribbon. There will be no time limit! To make it easier to find this post to show us what you did, I'll post a link in my right side-bar called Show Us What You Did that will link back to this post.
Sound like fun? I'll play, and I hope you will, too!
Update 04/18/2008: Here's my first two attempts with the ribbon.
 This one came together in about 5 minutes after I saw Jen del Muro's SFYTT #6. I had the card stock and ribbon out, and the panels just worked for me. I cut the ribbon in half to get it narrow enough, and I put tape along the back edges so it would stop shredding!
I think I may have used this sentiment once since I got it, but I had it in mind for this layout. I colored it with markers. The Pretties Kit flowers are paired with the Rhinestone square brads (turquoise, of course.)
Sentiment, pretties kit flowers, brads and card stock by SU. Ribbon from my Ribbon Outlet stash.
 This was actually the first layout I tried, and it took me a few days, because as usual, I layered the ribbon, then looked at it. And looked at it. Finally, after getting out the Pretties Kit for the second card (above) I took out the half-pearls and it just went together.
Please ignore that really bad embossed sentiment. I had good intentions, but the EP stuck to the whole background, even though I stamped that 24 hours before! What a mess ...
Card stock, sentiment, floral bg and pearls by SU. Ribbon from my Ribbon Outlet field trip.
If you want to play, just let me know and I'll send you some ribbon!
Trip Report: Offray Ribbon Outlet
I drove. I gaped. I shopped. But first, I met Heather! After the first 30 seconds, we realized we are cut from the same cloth, and the more we talked, the more we found we had in common. After she and her family move into their new house and get settled, we will meet up again for play days, workshops, and such. It's always nice to meet people that 'get' you. :-)
Now, about that Outlet. Let me say this place is not nearly as large as I thought it would be. I don't know why I thought it would be big; it is no different than any factory that has a small retail outlet stuck on the front of it. But man, what they have packed in there!
I tried to be really good, and I think overall I did make some good choices, both in what to buy and what not to buy.
 Here's The Loot, all nice and contained. Those three bags were a total of under $40. While that is a very large amount to spend at this particular Outlet, I am not aware of ANY place you can fill that many bags that full for $40, even at the Dollar Store!
I had two things in mind to look for - velvet and twill, neither of which I found. But look what I did find:
 These spools are the largest thing I got, and they are heavy! When I first discovered the bin holding them, Heather and I thought the ribbon on them had to be by-the-yard. HAD to be. Nope. The whole spool was $1.50. That's it! And since this really is twill, even though it is pretty thin, $1.50? SOLD!


 In the same bin was this partial spool of lace. Heather really liked this one, too, and for 50 cents she also grabbed one. 50 cents!!!!!

Here is a close-up of the lace.
 I told myself I did not need grosgrain. After all, I could buy that from myself, right? This spool of 5/8" wide Navy Blue grosgrain is about 8" in diameter. $1.25. I had to get it! I also got some Taupe. And Cream, I think.
Now, about that Outlet. Let me say this place is not nearly as large as I thought it would be. I don't know why I thought it would be big; it is no different than any factory that has a small retail outlet stuck on the front of it. But man, what they have packed in there!
I tried to be really good, and I think overall I did make some good choices, both in what to buy and what not to buy.
 Here's The Loot, all nice and contained. Those three bags were a total of under $40. While that is a very large amount to spend at this particular Outlet, I am not aware of ANY place you can fill that many bags that full for $40, even at the Dollar Store!
I had two things in mind to look for - velvet and twill, neither of which I found. But look what I did find:
 These spools are the largest thing I got, and they are heavy! When I first discovered the bin holding them, Heather and I thought the ribbon on them had to be by-the-yard. HAD to be. Nope. The whole spool was $1.50. That's it! And since this really is twill, even though it is pretty thin, $1.50? SOLD!
To give you an idea of scale (since I am such a lousy photographer), that is a 6" ruler. $1.50!!!!!!

To give you an up-close-and-personal shot, I pulled out a piece of each one. And yes, they are a little glimmery, especially the rust-colored one. I think I have enough of these to last a lifetime. Look for some in upcoming Blog Candy. I do not think I will miss it ...
 In the same bin was this partial spool of lace. Heather really liked this one, too, and for 50 cents she also grabbed one. 50 cents!!!!!
Here is a close-up of the lace.
 I told myself I did not need grosgrain. After all, I could buy that from myself, right? This spool of 5/8" wide Navy Blue grosgrain is about 8" in diameter. $1.25. I had to get it! I also got some Taupe. And Cream, I think.
Oh, and I have no plans to wind this one around a clothespin, just in case you were wondering.
 Then there were the "so out of my comfort zone I had to try it" spools. This one is kindof Vintage-looking, and will definitely challenge me.

This one is purple and teal - waaaay outside of the ole comfort zone.

 Then there were the "so out of my comfort zone I had to try it" spools. This one is kindof Vintage-looking, and will definitely challenge me.
This one is purple and teal - waaaay outside of the ole comfort zone.
There is a LOT more, but I will not bore you with more photos of the usual suspects - mostly normal-sized spools of satins in colors SU does not offer, if only to make myself feel better about being disloyal. I think it is safe to say I am pretty set for ribbon for a while. I may even be over the urge to buy the new Papertrey colors, though some of my new satin ribbon would go nicely with their Moss, Aqua and Berry ...
On the way out of the store you get to pick a free Grab Bag of ribbon and other stuff. Heather and I sat in her car and sorted through our free stuff, handing off to each other what we knew we would never use. At the end, she handed me a chunk-o-ribbon and a challenge: use it.

Baby ribbon! Oh, JUST what I need! I tried to see it as anything other than baby ribbon. She suggested candy ... I said maybe Cotton Candy? ... but I kept coming back to Baby. She just smiled and left me to my thoughts.
Right now my challenge is to put all this stuff away ... somewhere ... and start cutting card stock for my workshops. Most of tomorrow will be spent outside at the LSS's Yard Sale trying to sell my retired SU stamps sets, miscellaneous stamps, inks and punches, and anything else I can grab and get out of here. Tomorrow evening will be spent setting up and cleaning. Sounds like fun, huh? :-) I will report back on how the Yard Sale goes.
Thursday, April 10, 2008
I Actually Stamped Something!
I have been so busy these past few days, it's been tough to actually finish a stampin' project. I started plenty of them, but they just sat there, needing attention. I got out of work early today for a Doctor's appointment, which also got out early (what a nice surprise!), so I grabbed the time to finish something.
But first - a little about what's been hogging all my time. I got an E-Z Up tent last weekend, and it needed to be taken out of the box and readied for use. This involved moving some stuff in my teeny tiny condo to allow me to open the tent part-way so I could attach the top canopy. Easy! I collapsed it and forced it into its case and set it up against the wall. The next day after work I moved stuff around in my car and put the tent into the car. I told you that's where it would live!
So what's the hurry with the tent, you ask? Well, this Saturday I am participating in a Yard Sale at the local stamp store. The LSS that is closing its doors, at least the brick-and-mortar location. ;-( I take this annual opportunity to sell my retired Stampin' Up! sets that have not sold online, and let me tell you, I have a ton of them left! The tent was necessary because if I did not have one, it would definitely rain. Now that I have one, it will not. And yes, I take my umbrella when I go out to lunch so it won't rain...works like a champ, but I digress. So anyone in the neighborhood of Montgomery County, Maryland, come on over to The Rubber Chicken, Saturday, April 12th, 9-3, and BUY MY STUFF!!!! Pleeeeeeease......
Also this week, I received the Ribbons and Bows Oh My shipment, and since I am hosting my workshops this weekend I needed to put it away. I dutifully sat there one evening and wound each of the spools onto clothespins and actually put them away. Without using them!!!
 Here is a very poorly-lit photo of all my new ribbons, post-winding. They are all 3/8", and I think next time I will get the 1/4" instead. There's always a next time!
While taking the photo, I found myself thinking how several of the colors went so well together (I am so easily distracted) ...
 ... like the Navy and the Celery. Maybe the two ribbons would not work, but the two colors definitely would!

...then the Celery and the Taupe...

... followed by the Navy and the Yellow. Now if I called that Maize and Blue I could say "Go Blue!" :-)
But first - a little about what's been hogging all my time. I got an E-Z Up tent last weekend, and it needed to be taken out of the box and readied for use. This involved moving some stuff in my teeny tiny condo to allow me to open the tent part-way so I could attach the top canopy. Easy! I collapsed it and forced it into its case and set it up against the wall. The next day after work I moved stuff around in my car and put the tent into the car. I told you that's where it would live!
So what's the hurry with the tent, you ask? Well, this Saturday I am participating in a Yard Sale at the local stamp store. The LSS that is closing its doors, at least the brick-and-mortar location. ;-( I take this annual opportunity to sell my retired Stampin' Up! sets that have not sold online, and let me tell you, I have a ton of them left! The tent was necessary because if I did not have one, it would definitely rain. Now that I have one, it will not. And yes, I take my umbrella when I go out to lunch so it won't rain...works like a champ, but I digress. So anyone in the neighborhood of Montgomery County, Maryland, come on over to The Rubber Chicken, Saturday, April 12th, 9-3, and BUY MY STUFF!!!! Pleeeeeeease......
Also this week, I received the Ribbons and Bows Oh My shipment, and since I am hosting my workshops this weekend I needed to put it away. I dutifully sat there one evening and wound each of the spools onto clothespins and actually put them away. Without using them!!!
 Here is a very poorly-lit photo of all my new ribbons, post-winding. They are all 3/8", and I think next time I will get the 1/4" instead. There's always a next time!
While taking the photo, I found myself thinking how several of the colors went so well together (I am so easily distracted) ...
 ... like the Navy and the Celery. Maybe the two ribbons would not work, but the two colors definitely would!
...then the Celery and the Taupe...

... followed by the Navy and the Yellow. Now if I called that Maize and Blue I could say "Go Blue!" :-)
Ahem. Okay, I put that all away and moved on. I started to play with my new Tart & Tangy set from Stampin' Up!, partly because I had it and it was staring at me, partly because I realized I have April and May birthdays coming up fast with no cards made yet, partly to try the Scratch & Sniff Technique, and partly to see if any of the above might yield a project for next month's workshops. This is what I ended up with:
 Recipe (All Products by Stampin' Up!): Stamps - Tart & Tangy, Sassy Suzie; Paper - Whisper White, Bashful Blue, Real Red, Summer Picnic DS paper; Ink - Real Red and Garden Green markers; Other - Ticket Corner punch, 1/2" Circle punch, red gg ribbon.
The central piece sorta evolved, as do most of my projects. I stamped the two cherry images too far apart, and since they were almost straight, I tried to save the piece by tying a ribbon down the gaping white middle section. I remembered a card I had seen earlier this week on someone's blog (sorry - I cannot remember where - please tell me if you know!), and she had punched some notches in the center to hold the ribbon, so I copied her idea. I really like how it adds a little bit of something to go along with the notched corners.
 Recipe (All Products by Stampin' Up!): Stamps - Tart & Tangy, Sassy Suzie; Paper - Whisper White, Bashful Blue, Real Red, Summer Picnic DS paper; Ink - Real Red and Garden Green markers; Other - Ticket Corner punch, 1/2" Circle punch, red gg ribbon.
 The central piece sorta evolved, as do most of my projects. I stamped the two cherry images too far apart, and since they were almost straight, I tried to save the piece by tying a ribbon down the gaping white middle section. I remembered a card I had seen earlier this week on someone's blog (sorry - I cannot remember where - please tell me if you know!), and she had punched some notches in the center to hold the ribbon, so I copied her idea. I really like how it adds a little bit of something to go along with the notched corners.
This is the image that I wanted to use with the Scratch & Sniff. I mixed a bag of sugar-free off-brand cherry gelatin with clear embossing powder. I started measuring by teaspoons, but there was so little left, I just dumped it in. Then I spooned in more than that amount of clear embossing powder, like double the amount, giving me about a 1-2 ratio of gelatin-to-EP. I have seen so many different 'perfect' ratios of cherry stuff (gelatin or powdered drink mix) that I had no idea what would work, but whatever I did, it didn't. I went over the cherry images with a Versamarker and put the powder concoction over it. That's when it did everything bad that everyone warned about - leaving a red residue on the white card stock, embossing lumpily, if at all...ugh. For the card above I gave up and just put a drop of Crystal Effects on the cherries instead, and smoothed it around with a toothpick. Done! I'll work on that Scratch & Sniff thing another time.

Next up is a card that literally took under 10 minutes to make. I call it Faux Everything, because I used 'other' techniques to make something most people make using a Cuttlebug and Score-Pal, like these. Here's mine:

Recipe (All products by Stampin' Up!): Stamps - Sassy Suzie; Paper - Wild Wasabi, Whisper White; Ink - WIld Wasabi; Other - Dots Brass Template, Bone Folder, Horizontal Slot Punch, Wild Wasabi double-stitched ribbon.
I cannot use the 'bug in a Stampin' Up! workshop, and I do not have a Scor-Pal (couldn't use it anyway), so I had an idea. I saw my SU Dots Brass Template - left out from my last workshop. Yep, I tell ya, leaving stuff out is the way to go for inspiration! I used it to make the rows of dots along the top and bottom of the piece of white card stock. Then I lined it up on my grid paper and scored two lines with a ruler and my bone folder. It is not exactly the same as the Swiss Dots CB embossing folder + Scor-Pal, but I think it works. So far we have Faux Cuttlebug and Faux Scor-pal. Then I decided I did not want to wrap a piece of ribbon around the whole card, so I used two short scraps and just taped them to the back of the white card stock. Faux Wrapped Ribbon. :-)
Both of these cards have potential for both customer b'day cards and projects for next month's workshops. Not a bad afternoon, if I do say so myself!
My next goal is to work down through some more layers of stuff on my tables, as I seem to have lost my little bag of Ribbon Slides I got from SU, and if I do not find them before Sunday, The Ladies will be tying plain old knots instead of using a shiny silver ribbon slide on their projects. It's here, somewhere ....
Oh, and tomorrow is The Day. The day I take my little field trip to meet Heather and visit the Offray Ribbon Outlet. Oh, my, I am a bit worried, but I hope I can be reasonable. We'll see how that goes. I'll be sure to report back!
Wednesday, April 9, 2008
Just Because I Could
I just got off a phone call with a friend and realized how much rant I have pent up inside of me lately. Since I have vowed to keep this site a mostly-stampin' site, I have spun off a new B1tchin' Blog, and it is also linked in my right side-bar. The most I will ever do on this blog is point out that I have ranted elsewhere. K? K!
I really tried to stamp tonight. I got out my new Tart & Tangy set from SU and tried to make Scratch N' Sniff images. All I ended up with was cherry-smelling clear (now pink) embossing powder. Since I have to get up at O'Dark Thirty, I need to hit the hay now, so that little project will have to wait for tomorrow. It has much promise, if I could only get the right mix. Thank goodness I do not need clear embossing powder for this weekend's workshops! :-)
I really tried to stamp tonight. I got out my new Tart & Tangy set from SU and tried to make Scratch N' Sniff images. All I ended up with was cherry-smelling clear (now pink) embossing powder. Since I have to get up at O'Dark Thirty, I need to hit the hay now, so that little project will have to wait for tomorrow. It has much promise, if I could only get the right mix. Thank goodness I do not need clear embossing powder for this weekend's workshops! :-)
Monday, April 7, 2008
Ain't It The Life?
My Brother and his family have a puppy who is more like a small horse. She is part Great Dane and part English Mastiff. My first thought was, "OMG!" At about 7 months she was nose-high to the Kitchen counters, and as he so knowingly stated, she does not know her own size.
She was "fixed" last week, and he sent me a post-op photo of her, along with permission to share:
 I accused him of staging this, but he said Nope, that's her blanket, her spot, and her sleep toy. All he did was fold up the bottom of the blanket. Aaaaw. But look at those feet! And she is not a year old yet (maybe close, though)! She is such a sweety, although I understand she has discovered the flower beds in the wet corner of the back yard and is digging her way to China every chance she gets. Can you say "invisible fence"? That's next!
 Happy Monday!
Sunday, April 6, 2008
Watermarks
When I first got brave enough to post something online, I just used the text editor that lived within my photo editor to put my name and some credits onto the image. After a while this got old, plus I kept making typos which got really bothersome, so one day I gave in and bought a watermark.
There are a ton of sources out there for purchasing a watermark, plus tutorials on how to make your own. Personally, I am lazy and very into that whole instant gratification thing, so it was much easier to have someone do it for me. ;-)
I got mine from Mama Dini's Digi-Sig Diner. She was super fast and efficient, and very helpful in all ways possible. She has so many styles to choose from (from which to choose), I had a difficult time, but I finally decided on this one:

When I first got the file from her, I told her I'd post back with an example of a card using her watermark, and I am finally getting around to doing that. So Mama Dini - here you go!

For future reference, I have also added a link to her site in my Side Bar. Thanks Mama Dini, for making my crooked stuff a little more professional-looking! ;-)
Saturday, April 5, 2008
Caution: Stamping Can Be Hazardous To Your Health!
I once posted an alert that stamping can be fattening. That happened after a routine Doctor visit and the obligatory weigh-in. Ugh. Now I find out that it can also cause back problems. You see, my Day Job involves a lot of sitting, and this addicting hobby we call 'stamping' also involves a lot of sitting. Translation: I do a lot of looking down. I went to a specialist to talk about why my back hurts (nay, aches) to the point where my once-monthly massaaaages are now only two weeks apart, and sometimes I see her in-between those. There is something else going on here, I say; thus the Doctor visit.
His first question was What do you do all day? I sit at a computer.
And how do you spend your evenings? I sit at my craft table.
Do you exercise? And getting up to get more paper or different stamps, and pulling tape repeatedly out of the tape dispenser do not count. Uh, then No.
Do you read in bed? Uh, yeah, that's how I wind down so I can fall asleep.
I could see my reasons for living coming to a screeching halt...Further questioning revealed not only do I sit all day at work, the fact that by the end of the day I am slouched down in my chair is a really bad thing. I told him I do this because my upper back hurts, and that seems to relieve the ache. Unfortunately what it is doing is messing up my lower back. Here is what he told me to do:
1) At work, sit up straight, in a good chair, and do not slouch. If you ache, sit up straighter. I was really hoping he was going to tell me that sitting at a computer all day was killing me and I had to stop working. No such luck.
2) Stop stamping. AAAAAUGH! You might as well ask me to stop breathing! Seeing that I was not going to give in to his demands, he strongly suggested I at least look into a drafting table or something similar so I can work on an angle and not look down so much. I then asked him if Insurance will also cover the larger condo I'd need to HOLD this drafting table, to which he replied, "Yes, and the trip to Hawaii to help you relax, too!" I took that as a No.
3) It turns out reading in bed is only bad if you sit up and read (looking down.) Since I have a Tempur-Pedic pillow that supports my neck (and I have slept like a rock ever since I've had it - you should get one, too!), I lay flat on my back, with the cat sleeping on my chest, so I read flat on my back. The Doctor looked at me funny and asked if I hold the book over my head to read, and Yes, I do. The cat kinda makes that necessary, but at least I am not looking down, so I am okay. Until my arms get tired, that is, but I am usually nodding off by then, so it all works out just fine. I am officially allowed to keep reading at night. (yay!)
4) I get to go to four weeks of physical therapy to work on my lower back. We'll address my upper back later.
So today I spent the day stamping. I never listen, and I have my workshops next weekend, and no clue as to projects, so I had to do it, don't you see?! Fortunately I got all five projects designed, and I have until later this week before I need to start cleaning off the tables and cutting up card stock for the kits. Until then, I'll work my way through the heap(s) on my tables and keep making stuff for my Farmers Markets that are only a few short weeks away!
 ... Yes, shaving cream. Do you know how difficult it is to find shaving cream? This was one of the things on my shopping list the other day when I successfully avoided the dreaded Dollar Spot, but there was none to be had. All they had was shaving gel, not shaving cream. Bah! I had to go to a big-chain grocery-type store, and they had two - just two - brands of shaving cream; the rest were all gels. But I did find it, so I decided to try the Shaving Cream Technique, and if it was not too much of a mess, I'd use it for next weekend's workshops. I started to play, and I have to say, I have no idea what took me so long! This was a lot of fun! And it smells good, too.


His first question was What do you do all day? I sit at a computer.
And how do you spend your evenings? I sit at my craft table.
Do you exercise? And getting up to get more paper or different stamps, and pulling tape repeatedly out of the tape dispenser do not count. Uh, then No.
Do you read in bed? Uh, yeah, that's how I wind down so I can fall asleep.
I could see my reasons for living coming to a screeching halt...Further questioning revealed not only do I sit all day at work, the fact that by the end of the day I am slouched down in my chair is a really bad thing. I told him I do this because my upper back hurts, and that seems to relieve the ache. Unfortunately what it is doing is messing up my lower back. Here is what he told me to do:
1) At work, sit up straight, in a good chair, and do not slouch. If you ache, sit up straighter. I was really hoping he was going to tell me that sitting at a computer all day was killing me and I had to stop working. No such luck.
2) Stop stamping. AAAAAUGH! You might as well ask me to stop breathing! Seeing that I was not going to give in to his demands, he strongly suggested I at least look into a drafting table or something similar so I can work on an angle and not look down so much. I then asked him if Insurance will also cover the larger condo I'd need to HOLD this drafting table, to which he replied, "Yes, and the trip to Hawaii to help you relax, too!" I took that as a No.
3) It turns out reading in bed is only bad if you sit up and read (looking down.) Since I have a Tempur-Pedic pillow that supports my neck (and I have slept like a rock ever since I've had it - you should get one, too!), I lay flat on my back, with the cat sleeping on my chest, so I read flat on my back. The Doctor looked at me funny and asked if I hold the book over my head to read, and Yes, I do. The cat kinda makes that necessary, but at least I am not looking down, so I am okay. Until my arms get tired, that is, but I am usually nodding off by then, so it all works out just fine. I am officially allowed to keep reading at night. (yay!)
4) I get to go to four weeks of physical therapy to work on my lower back. We'll address my upper back later.
So today I spent the day stamping. I never listen, and I have my workshops next weekend, and no clue as to projects, so I had to do it, don't you see?! Fortunately I got all five projects designed, and I have until later this week before I need to start cleaning off the tables and cutting up card stock for the kits. Until then, I'll work my way through the heap(s) on my tables and keep making stuff for my Farmers Markets that are only a few short weeks away!
Here are a few of the cards I have on tap for next weekend. First up is a total case of a card by Kurtis Amundson a.k.a. Stampin Kub. I saw his card in this month's download of Sheet Load Of Cards and immediately knew I had to try it! I did change it up a bit to make it my own. I used the same Afternoon Tea papers from Stampin' Up!, but I used Wild Wasabi and Basic Gray, where he used Artichoke and Black. I believe he used rub-ons from another company, but I wanted mine to be all SU, so I used some Sale-A-Bration rub-ons. Every time I earned a SAB set this season, I got the rub-ons. I have a LOT of rub-ons, and I like to share, so my customers will help me use them up. A lot of them got the rub-ons, too, so they will appreciate the opportunity to see one way to use them. The stamp is from SU's Bursting With Joy set, which I got because it goes with the Jersey Shore papers. Maybe some day I'll even use them together. Some day.
Most of the ladies who attend my classes have been stamping for somewhere around 15 years, so there is really not a whole lot I can make up that they have not seen before. But they are also good sports, and they've told me to bring it on, no matter what it is, and if they used to know the technique, they've probably forgotten they knew it, so it will be just fine to learn it again. Like I said - good sports! This makes it easier for me to plan projects, hoping to interest the newer stampers, but not bore the more-experienced ones.
So one of the recent Demo Challenges on SCS involved ...
 ... Yes, shaving cream. Do you know how difficult it is to find shaving cream? This was one of the things on my shopping list the other day when I successfully avoided the dreaded Dollar Spot, but there was none to be had. All they had was shaving gel, not shaving cream. Bah! I had to go to a big-chain grocery-type store, and they had two - just two - brands of shaving cream; the rest were all gels. But I did find it, so I decided to try the Shaving Cream Technique, and if it was not too much of a mess, I'd use it for next weekend's workshops. I started to play, and I have to say, I have no idea what took me so long! This was a lot of fun! And it smells good, too.
The chipboard star on this card is covered with a piece of Whisper White card stock that was colored using the above-mentioned Shaving Cream Technique using More Mustard and So Saffron reinkers. The stars and sentiment are from Stampin' Up!'s In The Stars set from the Occasions Mini catalog. At last, we can make non-feminine cards with something besides trucks, fish, tents or sporting equipment.

The cool thing about the Shaving Cream Technique is you get two colored pieces of card stock for your effort. This card is actually the reason I wanted to try it. I largely CASED this card on SCS, but even though I think I actually have the stamp used in the original, I needed to use a Stampin' Up! image for next weekend.
Please do not look too closely or you will see where I ripped the sentiment off the bottom right of the card. It made the card too bottom-heavy, so I re-stamped it and stuck it above, instead.

And last, but not least, is a card inspired by a house I pass going to work. It is an older colonial with pale yellow painted brick, a slate roof, white trim and green shutters. I saw Barely Banana, Basic Gray and Sage Shadow, and since I had just received my latest shipment of goodies from SU, I used the Wonderful You stamp set and Stems & Silhouettes wheel. It's been a while since we've done two-step stamping, and it's time. I used Versamark to wheel the background, but it is too light to photograph. Actually, it is too light to see with the naked eye! (Hmmm ... I wonder where that phrase came from - naked eye. As opposed to what? Wearing something?) I may give my customers the option of using Barely Banana, or maybe even a darker yellow so it shows up more. They love having options.
Oh, and I did take a break from stamping today - I bought a tent! Not only do I have Commercial Insurance, I have a tent!!! I had not yet acquired one after all these years of doing craft shows, largely because I have nowhere to store one. But the new EZ-Ups are shorter than the old ones. The tent is the same size, and weight - ugh, but it folds up much smaller. Smaller is better. I plan to store it in my car, of course, but it will take up much less space, and it will be centered in the vehicle so my back end does not drag. That would be awful ....
Subscribe to:
Posts (Atom)