Thursday, December 31, 2009

Spinach-Artichoke Dip

Because I have nothing crafty to share this evening, I thought I'd share my Spinach-Artichoke dip instead. Well, truth be told, it is Artichoke dip to which I add spinach. The spinach is totally optional, but it does make it look real purty. Like this, straight out of the oven last night:


This is stinkin' easy. You will need:

2 cans artichoke hearts (NOT the marinated stuff)
1 C Mayo
1 C Parmesan cheese
Frozen or canned spinach (1 or 2 boxes frozen OR half a bag of frozen OR two small cans OR ...whatever)
garlic powder to taste
paprika

Drain the artichoke hearts and either (1) dump them into a food processor and, um, process them, or (2) chop them up by hand. I have taken to doing (2) because I am tired of retrieving the food processor from the bowels of its storage cave, assembling it, whirling it for less than 10 seconds, then having to wash it and put it away. A rough chop is fine.

Dump the chopped artichoke parts into a large bowl

Now that you can see how much artichoke you have volume-wise, decide how much spinach you really want. This can be spinach dip with artichoke instead of the other way around, if you want. No problem!

If using frozen spinach, nuke it or cook until it is no longer frozen (you do not need to really cook it thru), and DRAIN THOROUGHLY. You need to get all that water out of there, or you will have soup instead of dip.

If using canned spinach, you still need to drain out all the liquid.

Dump the spinach into the bowl with the artichoke pieces.

Add mayo and Parmesan. Season with garlic powder to your liking. I never measure this stuff, but I have left it out because I forgot it. Don't do that.

Mix it all up until thoroughly blended, and dump it into a pretty, sprayed-to-keep-stuff-from-sticking baking dish. Level out the top, and sprinkle it with paprika. It's aaaaallll about presentation, people.

Bake at 350 F - the universal baking temp - until bubbly ... I think about 30-40 minutes. I always get lulled into a coma smelling it bake, and then I forget about it and overdo it a little. This is a VERY forgiving concoction.

Let it cool a little bit before you dig in. I just take a cracker and scoop up the goodness.


M-m-m-m-m!

If you have any left over, it refrigerates well. I just cover mine with plastic wrap so I can pop it into the microwave the next day and call it 'lunch'.

Once you make it the first time, you will make your own adjustments on subsequent preparations, and there WILL be subsequent preparations! The original original version had something else along with the mayo, but I forget, and this is just fine, so I don't care.

Go forth and make this some time, then let me know what you think of it, and if you change it up, please share with us what you did so WE can try it, too!

Happy 2010, and thanks for stopping by!

Wednesday, December 30, 2009

More Trees

Yes, I bring you more trees. At least this time I employed a different technique, and I tried to do it all SU. I FAILED, but that does not mean that I did not TRY.

These are inspired by yesterday's sunset. The sky was mostly a deep blue, but down at the horizon it was a lighter blue with pink and orange mixed in. Just lovely. Of course, I failed to capture the colors on my phone's camera while standing in the parking lot of the post office, but still, again, I tried.

So here is pass #1:

I used the direct-to-paper technique with my SU ink pads. (I actually threw away the first 4 to 5 attempts ... such is my sacrifice for my art; so I guess this is really pass #6, but I digress. ) I started with Bashful Blue and schmeared it all around the top 3/4 or so of the card stock, leaving some un-inked spots on purpose to make it look more realistic. Then I swiped Pretty In Pink and a little Going Grey near the horizon. Then I went over the top part of the card stock with Brocade Blue - pretty much my go-to blue these days. I soaked it reeeeeal good, too. Even had to change the grid paper it was such a mess. Using a scrap of printer paper to make a distinct line near the bottom of the color, I went back over everything with the Bashful Blue.

I was going to stamp the tree in Basic Gray, but then I had a horrible thought: This stamp set retires effective January 4th, and my classes are not until the following weekend. You know what this means, right? It means I cannot use this stamp in my classes! ACK! All restrictions being off, I used Memento London Fog ink instead of SU Basic Gray. I am such a rebel.

I went over the stamped trees with my white gel pen, and then, in a fit of creativity, I poked in a few stars in the clear night sky.

I liiiike! And did you notice something strange? No ribbon. None. And I am okay with that. This time.

So today one of my Tweeple suggested moonlit trees resplendent with hearts as a cool Valentine's Day card. This gave me the idea for this evening's project:


I tried to replicate the sky from last night's card, and it's close. This time, though, I added a red heart brad from my stash to one of the tree branches. Just one heart - just a touch of color. How did I get it right in the middle of the card? Before I stuck the white layer to the Basic Gray layer, I poked a hole in the white piece with my paper piercing tool, drew the silver thread (with a glitter pen) down to the hole, then I stuck the brad in. The back of the brad is totally hidden between the white and grey layers. Poke-poke with the gel pen for the stars, and Done!

So what do you think? Besides the fact that I am in a shadowy-tree rut, what ELSE do you think?

In other news, I innocently planned to hit the grocery store on the way home this evening to get the ingredients for my Spinach-Artichoke dip that I said I'd bring to dinner tomorrow night, but the voice on the radio said the most feared words in these parts: Winter Storm Watch. This translates into an "oh my god i am out of bread, milk and toilet paper and i must rush to the store and buy some or we will all surly die" frenzy for the 500,000+ residents of my fair county. And they all go to whatever store *I* choose. I just wanted canned artichoke hearts and frozen spinach, but noooooooo, I had to battle the stoopid people for a parking space. I was nearly broadsided in the parking lot by someone who just had to get home before the roads became impassable. Seriously! THERE IS NOTHING FALLING FROM THE SKY, PEOPLE!

I must divulge that I was not at a real grocery store. No, I went to Target, thinking it might be better. What did I find? There was not.one.shopping.cart.in.the.entire.store. Not even the hand-carry ones. People were running in the aisles and their carts were filled with TP and diapers. The shelves were practically barren. I was scared.

The worst part? They had no frozen spinach. NONE! ACK! I thought for about 2 seconds that maybe I could go to the real grocery store for that, but then I decided it would be a suicidal decision, so I did something I have not done in about 32 years: I bought canned spinach. I DID! Please do not share this with any of my friends, because I might be banned from ever attending another dinner ever again. I will report back on if they detected my dirty little secret or not.

Okay, that's enough for this evening. I need to go bag and tag these tree cards and add them to my etsy store. If I don't get a chance to post tomorrow, Happy 2010, everyone!

Thanks for stopping by!

Sunday, December 27, 2009

Cool Branches - Parts 2-5

In our last episode, Shannon was worried Gayle would find out that she'd slept with Henry, but what Shannon did not know, was Gayle was sleeping with Conrad, who was cheating on both of them with Richard. Yes, Conrad is a closet homosexual, but no one but Richard knows. And Conrad, of course. Also, Shannon and Gayle are actually twin sisters, and both pregnant by the other's boyfriend. And NO ONE knows that Conrad and Henry are actually father and son, except Conrad's Aunt Millie, who is really Henry's sister, who had an affair with Joe, who used to be married to Carol, who is best friends with ...

Oh, wait, wrong show. This is the Cool Branches show ... right ... sorry about that. I watched about 5 minutes of a soap opera last week and it blew my mind how so many people could 'forget' they had children. Stoopid, so I turned it off and remembered why I do not watch TV, especially in the daytime.

ANYway, when I posted my Cool Branches blog entry, someone suggested the trees would look really great embossed, like Gold on Gold, or Silver on Silver, or White on White, so since I am constantly looking for ideas and blog fodder, and I really did not want to fold any more laundry tonight, I went with it.

Here is the original card:

I really liked the white accents on the branches. This one was stamped on white and blue was brayered over it. The ribbon is silver, even though you cannot tell from this picture.

Then I tried White on White:

Niiiice. I layered it with the same Basic Gray on a Going Grey card base that I used in the original card. I used Basic Gray taffeta ribbon on this one, though. And no white gel pen, because, well, it was alreay white on white, ya know?

Then we have some glaring-bad photography. What can I say? The embossed gold and silver were so shiny, I could not get the light at a decent angle. Sadly, these are the best I could do. There is also no white gel pen on these, because I forgot.

Here is Gold on Gold:

I layered the gold onto some Soft Suede, then on a Vanilla base. The ribbon is Kraft taffeta.

Next up we have Silver on Silver:

This one is layered on Basic Gray on a Going Grey card base, and uses the same silver ribbon as the original.

Do you think the Gold on Gold and Silver on Silver need some white accents?

Lastly we have another White on White, and I brayered some blue over it for the sky. I am not so sure I like it.

What do you think? Eh? Maybe? I think I like them all but this last one. What do YOU think? Please let me know!

That's all I have for this evening. Unfortunately I really must fold some laundry now so I can go to work in the morning.

Thanks for stopping by!

Cool Branches and a Bow How-To

One of my Tweeple suggested that cool, silvery winter branches would make a nice wintry card, and today I finally put ink to paper to give it a try.

The trees image is a Backgrounder stamp from CHF. I inked it up with Memento London Fog, which is a cool blueish-grey, and stamped it on SU Whisper White card stock. Then I brayered SU Bashful Blue over it, not caring too much that it was even. I did not care too much because I am basically lazy, but I also realized it was leaving the blue unevenly applied, which actually looked more natural. If anyone has been reading my blog for more than one day, you know that this is a happy accident, and I plan to say I meant to do that.

The trees are accented with a white gel pen. The ribbon is silver satin, and part of my stash from my Ribbon Outlet extravaganza which resulted in ribbon for life, aka: S.A.B.L.E. Go look it up. I was really looking for white, but apparently I have every color BUT white, and I decided that silver looked great.

The button is from my stash, and it is tied with some SU Linen Thread. The End.

Kidding.

I have been using this "tie a bow with a button" thing for a few posts now, so I thought I'd take some pics of my process, just in case I am not the last person on the planet to have figured it out. I am sure there are a bazillion ways to do this, and I have seen a lot of gorgeous cards that use the "button on the bow", but a lot of these cards are very ornate and, well, FAT. They have huge bows and the button is not even the largest part of the bulk. I make cards to sell, and they need to fit in an envelope, and people need to be able to afford postage, or they won't buy my cards. So my attempt here is NOT to reinvent the wheel; rather I hope to discover a way to add the button and still make the finished product mailable without taking out a loan.

Let us begin.

First I estimate how big I'd like my bow, then I fold it over on itself to make what will become ... the bow. Pretend I am holding this between my thumb and forefinger:

I like leaving the tails a little long so I can futz with it. Once I am happy with the size, I put a stitch through the center to hold it together. This one is stitched already, which is why it stays put.

DO NOT BE ALARMED! One or two of my customers survey the projects when they arrive to see if there is any sewing, and they request bandages be supplied at that station. But this is SO EASY, even they would not need medical supplies. I just took a piece of thread, threaded a needle, and did a simple up then down stitch. This leaves the top looking like this:

... and once you tie a quick knot in the loose ends, the bottom looks like this:

It really is easy, people. In fact, I think I'll use this in one of my January classes, if only to dispel the fear. And this step is NOT REQUIRED, though it makes the rest of the process much easier. I have done it without the stitching, and survived.

Now for the assembly process. First I wrapped a piece of ribbon around the front of the card:

DO NOT stick it down with adhesive all the way across the front of the card! I only applied adhesive to the ends on the back of the layer; the whole front of the ribbon is loose, practically flopping in the breeze. This is important.

Next we have the parts-is-parts for assembly:

... a length of Linen Thread, the folded/stitched bow, and a button. I looked long and hard for a two-holer, as most buttons have four holes. I find two is just easier.

Slide the Linen Thread under the ribbon band, move it over to about where you think its final resting place will be (this is why the "no adhesive" rule is so important), then lay the folded/stitched bow in place:

It does not need to be perfectly placed yet. There's still time to make adjustments.

Thread the ends of the Linen Thread (thread the thread ... I crack myself up sometimes) through the two holes in the button:

At this point everything is still loose - the folded/stitched bow is just sitting there, and the button is hanging by a thread (HAHAHA. Ahem, sorry.)

Next, tie the Linen Thread to kindof anchor the button - just once - no knot yet.

NOW, we work on positioning the bow. In my case, I wanted to slide it a little to the right - away from the edge of the card a little bit, so I slid it to the right:

THEN, I pulled the thread tight and made a square knot to secure it:

Trim the edges of the Linen Thread. Done.

If you are using wider ribbon, when you tie the Linen Thread to anchor the button, it will gather up some of the ribbon - kindof scrunching it. THIS IS OKAY, and I think it actually looks pretty cool. You can kinda see it in my Baby Card post.

Ta-da! The finished card:

I opted for no sentiment. I think it just looks so soft and chilly - totally the goal I had in mind.

Before I go, though I must tell you that BR #2 stopped by this afternoon to pick up her order, and she commented on my "photo spot":

She thought this was quite amusing. WHAT'S WRONG WITH IT?! Two pieces of Kraft card stock + a good light + two boxes of wipes to hold up the back piece of card stock = free photo spot. Hmph.

HOWEVER, I will say she liked my card catalog, and we went into the Captain's Quarters (CQ) to re-measure, and we think I can move it into the CQ where it would fit in better and become a crafty parts receptacle. Okay, I'll keep her, even if she DID mock my photo set-up. This means next weekend I'll be moving furniture again. I'll be sure to post some Before and After photos. :-)

Thanks for stopping by!

Saturday, December 26, 2009

Baby Cards and Blathering

I am beginning to see a pattern with the cat. She must be ON me or NEXT to me at all times. I worry she is getting old and needy (needier). I'd rather think she is spoiled by me not leaving town last weekend and getting to vegetate with me for two extended weekends in a row. Yeah, that's it, she is stinkin' spoiled.


In this shot I think she is just this side of comatose. I can shove her over a little so I fit on the couch, and she may open a eye to glare at me. Such a tough life.

I did manage to actually stamp something the past few days, though nothing normal, for me, anyway. By now you know I do not 'do' a lot of things - Christmas, Easter. Thanksgiving, Halloween, Valentine's Day, baby cards - yeah, pretty much everything. So yesterday I posted a Valentine's Day card, and today I bring you ... baby cards! I KNOW! You are on the right blog, I am just out of my element.

On to the baby cards. I spied this piece of paper in the new SU Sweet Pea paper stack, and thought it would work for a baby card. A little busy, but I like non-traditional. If I am going to step outside my comfort zone, I want to mix it up a little to make it "me".


This is all SU. The lion is from Fox & Friends, the sentiment is from Teeny Tiny Wishes. Ribbon is the new Vanilla Satin (YUMMY STUFF!).

What's cool about this paper is I used Rose Red and Pretty In Pink for the 'girl' card, and with a second piece cut from the same sheet of 12x12, this is how it looks with Taken With Teal and Sahara Sand:


I love all the colors that are matchy-matchy with this paper pack! Even *I* can pull off not one, but TWO baby cards in one sitting. Amazing stuff, I know.

Lessee, what else can I blather about to you? I went through my boxes of Farmers Market cards and pulled out all my 'old designs', put them in a flat rate mailing box, and will send them to a Cards For Soldiers group. This is a great cause which gives blank cards to deployed soldiers so they can have something to write in and send home to their families. It also thins out my inventory and makes room for new stuff for next season.

I also pulled out a bunch of cards that I'll be posting in my etsy store as time permits. I like having the store as an additional outlet for my cards, so they do not just sit in boxes all winter.

In other news, I am rethinking my Mass Production mode of operation. I like making one or two of something, then moving on to something else. Someone mentioned a one-of-a-kind card might be perceived as more special than one of several, and she may have a point. I might try that approach this year and see how it goes.

I also want to work my way into tiered pricing, which would enable me to use a more expensive element (like a hand-made button or a charm) on a card and charge a little more for it to recoup the additional cost of materials. A good friend had suggested tiered pricing to me many years ago, and I have been too lazy to work out the pricing, but now that I am buying more specialty things, it might be time to take that leap. This also works into the one-of-a-kind approach, as I would rarely have more than one of anything like hand-made buttons.

So we'll all see how this approach works out between now and March, which will be my first show of 2010. I'll have time to test-drive my theory and change course before the farmers' markets start up again in May. ;-) I always need a safety net.

That's all for now. Thanks for stopping by!

Friday, December 25, 2009

Valentine's Day - already?!

Merry Christmas to all who celebrate this day! I, however, have been working on ideas for Valentine's Day, and how to incorporate new stuff into a card for my January Stamp Camps.

Valentine's Day is another one of those holidays I do not 'do', and up until now I have been fortunate not to have any craft shows around that time of year, so there has been very little pressure to succumb to the craze. But this year I have a decision to make: Do I make Valentine's Day cards for my etsy store, or not?

So what did I do? When I placed my SU pre-order, I got a bunch of (but not ALL of) the Valentine's AND Easter stuff. I do not celebrate Easter, so I do not 'do' it, either, but this year I do have a show in March, so that will also change. My world is turning on its ear!

Last night I played with the new SU "I {Heart} Hearts" set, along with the new "Well Scripted" words set and the Sweet Pea DSP. First up: the hearts.


I chose this one not only for its size, but because I love the pattern, and thought it would be very pretty embossed in white. I used White Craft ink to stamp it on the Pretty In Pink card stock, and the SU Detail White EP. Lovely!

You will notice the two hearts are cut out differently. The one on the left was hand-cut (it's crooked, of course) and the one on the right was punched out with the SU Heart punch. I knew the heart stamp image was not symmetrical, and that it would not punch out evenly, but given my cutting skills, I wanted to see just how far off it was. Not too. So I think I'll give The Ladies a choice: hand-cut or punch.

This is my card, so far:


I needed to use that satin ribbon, and let me tell you: it is LUSCIOUS! (OMG, I need to incorporate that into everything this spring! Good thing I bought it in every color! ) I played with the layout for quite some time, and this is where it stands right now. LOTS of new things here: paper, ribbon, two stamp sets, tiny heart punch and a Sizzix butterfly die. I am still trying to figure out why the flutterbys stick in the die, but they come out pretty easily when coaxed by the point of the paper snips.

Anyway, I love the flutterbys themselves, because of the different textures on each one. The first time I used the die I had the paper in backwards and punched the wrong side (I got green instead of pink), but they are so gorgeous, I'll just use them on another card! :-)

For my next trick, one of my Tweeple suggested bare, glittery branches for a Winter-type card, so I'll play with that today.

Enjoy your holiday, or your day off, and thanks for stopping by!

Wednesday, December 23, 2009

My First Acetate Card

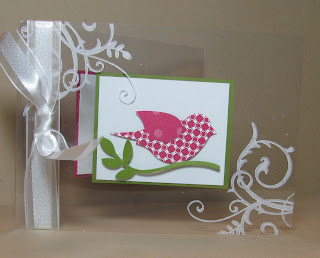
I did it. I took the plunge and made an acetate card. Yep, and it was FUN! Pretty easy, too. Check it out:

My inspiration came from this card, and I changed it up so I could use the new punch and one of the In Colors, which I have been neglecting as of late.

The trick to doing these is to put the layering behind your top layer, like on the other side of the acetate. In this case, only the bird and branch are on the front of the card. The white & olive layers are first stuck to each other, then I applied glue dots on the inside of the card front, behind the bird image so they don't show. Then I hovered the acetate front with the bird over the white & olive pieces, and when it was pretty-much centered ("pretty-much" works in my world) I stuck it down and the hidden glue dots held it in place.

You could line up the white & olive pieces on the grid paper, then line up the acetate to make sure it is straight instead of eyeballing it. I actually did that in another attempt. I make many attempts at things before I go to press. :-)

The white piece on the inside of the card (where you'd write a little note) is the same size as the olive piece, so you cannot see it when the card is closed. I guess it could be larger if you wanted an additional white frame around the olive layer. The Melon Mambo piece is attached to the outside of the back of the card, stuck on with glue dots. It frames both the inside white piece when open, and the front layers when closed.

I think I'll make the Melon layer a full 1/4" larger than the white instead of the measly 1/8" I used here. That will be more forgiving with alignment challenges.

The white swirls are made with the flourish stamp from Baroque Motifs with White Staz-On ink. What I like about having the white & olive layers on the inside is you can stamp the flourish so it slops over the layer without actually stamping on the layer, if you get my drift, like in the upper left. I just love that look.

I think this will be one of my January Stamp Camp cards. One down, three to go.

Note: Other products used: SU acetate sheets, Melon Mambo DSP, Old Olive card stock, Extra Large Two-step Bird punch (Occasions Mini), White Organza ribbon.

Thanks for stopping by!

For a Brave Little Girl

Wanna do something really nice? Check out this post and leave her a comment if you'd like to participate. I'll be sending the little girl a card.

Happy Festivus! ;-)

Tuesday, December 22, 2009

Feats of Strength

I am a slug. A total slug. I think the shoveling of snow for three days has sapped any remaining energy in my body. Luckily the sun has been shining brightly for two days, now, and may eventually MELT the snow off my car so I can go to work tomorrow.

I have done zero stamping, though Lord knows I've tried. My mojo has taken a break, and I am filling my time with other things. What other things? Well lookie what arrived at my house:


That's right! My card catalog! I bought this on etsy and it has arrived chez moi, at last. I had the nice FedEx guys bring it inside for me, since I just knew I'd have 'lifting' issues. At least if it started out indoors, I'd have a shot at assembling it. In total it weighs about 350 pounds, and I estimate (based on the few remaining unpulled muscles in my body) that each drawer section weighs about 100 pounds. There's three of the drawer sections plus the base and top cap piece, which is set there on top.

Before I could unpack it, though, I needed to have a place for it to live, so I decided to take the brown cabinet from my front hall and temporarily move it into the Dining Room.

This is the brown cabinet that was in the front hall:

It held my CDs and my VHS tape collection. (I'd already emptied the top shelf before I thought to take this picture. ) After I emptied all the CDs out onto the Dining Room table in an attempt to lighten the thing, it was still too heavy to lift (darn particleboard) so I dragged it, and broke off one of the supports in the process. Oh, well, that's what you get with put-together-yourself furniture. Maybe I'll just give it away, or something.

Then I started to unpack and assemble my card catalog. Here is the base plus one of the drawer units:

See those little slots on the top? There are pieces on the bottom of each drawer unit that fit into them so they nest nicely. This also keeps them from living anywhere ELSE as separate units, though. I had thought I'd put one of the drawer units here, and maybe stack up the other two in another room, but that was not to be. ;-(

Here is the whole thing assembled in my front hall. (Please ignore the cans of Raid - they keep the ants at bay. ) Then I decided the cabinet is too big to stay in the front hall, so I started to move things around.

I took out all the drawers, then took off the top cap piece and disassembled the parts-is-parts and set them in the Dining Room.

Then I moved this green cabinet from the back Dining Room wall into the front hall:

It holds all sorts of miscellaneous crafty stuff inside, and on top, too. I need to find homes for all the stuff on top, anyway, and re-purpose this as a front hall piece to hold my keys, etc.

Just around the corner, in the dining room, is the brown cabinet that used to be in the front hall:

... and some packing materials I had to move out of the kitchen so Her Highness could find a path to her food bowl.

There's the card catalog relocated to the back Dining Room wall where the green cabinet used to live:

It is still too big for this spot, but it's better than the front hall. There was a cross stitch piece on the wall here, and those screws in the wall above the cabinet used to hold a shelf that is now gone. All the stuff from that shelf now lives on top of this cabinet.

Then there's the CDs:

Okay, I have a huge collection of CDs. Most of them are by people most of you have never heard of - I like to support the independent small-type musicians, so I buy their CDs when I see them perform live. I also have CD players in both my cars, so it was a natural for me to collect them.

But NOW I needed to find them a home. They are too tall to stand up in the card catalog drawers, but not too big to lie down:

In alphabetical order (you expected less?) I started at Z (Warren Zevon) and worked my way backwards to A, laying what I could fit into each drawer. The only artists that got their own drawers are Bruce Springsteen, The Kennedy's, and maybe Mike Cross and Tom Paxton.

A few of the drawers came with the cards still in them YAY!), so I put them in the top section, which is pretty much too high for me to see into the drawers.

It is tough being vertically challenged. Oh, and for all you young uns, THIS is what we used to have to plow through to find books in the library. Uh-huh. It's true! The drawers slide out easily, and you can take one to a table and look through it, then bring it back and take out another drawer. I used to find all sorts of things that I had no idea were there. Kindof like reading the dictionary. What, you don't ever read the dictionary? You should try it some time! Seriously!

So that's it with the furniture movement. I'm thinking I'll get a pretty basket or box to put under the cabinet to hold all my VHS tapes still in that brown cabinet. Then I can freecycle the cabinet. Or not. I may actually fix it and leave it there. Only time will tell.

In other news, kitty has found a new nest. In my wanderings the past two days, I have actually managed to do a few loads of wash, and I had left the light on and door open to the laundry room, and lookie what I saw:

She actually jumped up onto the washer & dryer, which is no small feat for her, because sometimes she forgets she is a cat, and that she CAN jump. I have a stool next to the end table where her water fountain lives so she can get to it, since she forgets she can jump. I could not make this up. She has issues with 'up' and 'down'.

So you can see she chose the laundry basket for a perch. I looked back later and saw this:


Yep, all cozy and comfy. To her it is new, so it is fun. Then I turned on the shower and broke the spell. She needed to assume her position on the counter while I showered. Kids, whatareya gonna do.

That's about it for now. I am working on an acetate card for my January stamp camps. I even bought enough acetate to go around, just in case I get a clue about what to do with it. You can be sure I'll be CASEing something. I'll show you what I make once it happens.

Thanks for stopping by!

Sunday, December 20, 2009

We Got A Little Snow

We had a little bit of snow. We do not get much snow in the DC area - we get lots of ice, though. If it does snow, it's usually in February, not December. It's usually still 50 degrees in December. In fact, I think it was 50 degrees last weekend!

Saturday morning I was on schedule to leave for Michigan. I stubbornly decided I could deal with the snow and just planned to drive out of it. The patch of clouds on the weather map seemed to stop somewhere in PA, and I was headed West into OH and then North into MI. No problem.

I started out shoveling my front walk, like a good citizen. I'd arranged for my cat sitter to bring her son along to shovel the rest later into the weekend.

Even though it was still snowing, this does not look too bad, does it?

Bah, it's just a little snow! I showered, packed the car, calmed kitty, and hit the road.

About 3 miles North it started looking more like this:

This is I-270, near Germantown, for the benefit of you local types. The 'I' in I-270 means 'Interstate', but does this major road look plowed to you? Nuh-uh. But I was OKAY with that, since I only needed to go about 30 miles up to Frederick and pick up I-70 West.

Silly me - this was I-70:

DO YOU SEE ANY PAVEMENT? I did not. It was snowing and not well-plowed and if I exceeded 40 mph it was slippery. We were all driving with our flashers on, as we were all going under 45 mph. There were some yahoos passing on the left, and there were also some yahoos in the ditches and medians along the way.

A lot of the time it looked like this:

... which was fine with me, since I was pulling over the best I could ever few miles to stop and clean the ice off my wipers so they'd actually WIPE.

It took me almost 2 hours, but I made it 45 miles to Hagerstown, exited the "expressway" and pulled into my usual coffee-and-potty-stop McDonalds. Ach, I said, ach - it's just a little bit of snow, right? So I got back on the highway and kept going. I almost did not make it to the next exit. I could not even SEE out the windshield. I stopped in a parking lot and called my Brother to tell him I was not going to make it. Then I called my Son and told HIM I could not make it. Then I turned around and headed home, and I arrived around 1:30.

This is what I came home to:

Those are my footprints in the snow, coming down my steps (remember those steps?) so I could get my shovel. That's my car parked perpendicular to my parking space - flashers still on. I had 10" of snow in my spot that needed to be removed before I could back the car in. I only took out what needed to be tooken out to get the car mostly into its spot. I am no fool. The snow was still coming down hard, and I knew it was not over. Get her in and get inside.

I did, and kitty stuck to me like glue the rest of the day.

This morning, I awoke to this:

There is a bush right next to my front door, and I included it for perspective. Lotsa white, huh?

I shoveled my way up my steps:

... and turned around to assess the vehicle situation. This is the Miata:

Not going anywhere any time soon. Poor thing.

I shoveled my way to the front of my car, but this heap of plowed stuff? Third time? Not going to do it. I AM NOT.

I have a neighbor with a plow on the front of his truck. See HIS spot? -->

If *I* had that plow, I'd plow all that City-truck-plowed snow from in front of my neighbors' vehicles. But he is not me.

Oh, look, I guess the Miata is REALLY not going anywhere any time soon:

My right arm already feels like it's going to fall off, so I made the decision to not dig out the front of my car. If I cannot hire someone to do it for me, I may not ever leave again. It will melt by Spring.

ETA: The maintenance guys were coming around putting down sand, and another neighbor stopped them and asked if they spoke English. One said yes. So she asked him if she could pay him to shovel her steps and front walk. He just smiled. Speaks English - uh-huh. I pointed to my shovel and made the universal 'money' motion with my glittened right hand (you know, rubbing thumb and forefinger together?) He smiled REAL BIG and followed her. Yeah, money talks.

Then this little fella came home from his walk:

This is my neighbor, Jake, who lives upstairs from me with his humans. Nice hoodie and boots! Jake hates the snow on his feet.

This is one of my other neighbors and her human:

She is a wiggler, but she was wearing a nice purple frock! Little MinMin just lost her sister, and her Mom is going to adopt another pup as soon as she can. Her Mom also has a 19 year-old son who will come dig me out as soon as he returns home from work this afternoon. Yay!

Thus ends my tale of woe. Kitty and I have assumed the slug position once again:

... and plan to vegetate the rest of the weekend. I may put on real clothes and walk across the street to buy some food, but then again, maybe not. I have a potato I can call dinner.

I feel another nap coming on. Thanks for stopping by!