Tuesday, September 29, 2015

Steampunk, Huh?

The current challenge at Sisterhood of Snarky Stampers is Punk ... Steampunk:


I am about 20 years too old to know what Steampunk even is, so please be gentle with me. I was playing and futzing and WTHing, and this came out:


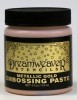
See? Clueless. No laughing. The background was influenced by a video Sandy Allnock made for her current Go for the Gold free class series. The first day was on Ellen Hutson's site. In that first demo, she put a thin layer of gold Modeling Creme onto some card stock, then stamped in it to make a pattern. I don't have Modeling Creme, but I do have gold embossing paste. I attempted to put down a thin coating, and then pressed the Hero Arts clock background into it. I don't think my embossing paste was thin enough, and the whole thing was goopy. I scraped most of it off, and started over. This is my 3rd background, and I called it good enough. It dried overnight.

After it dried, I decided it was too shiny, so I went over it with my Distress Paint Walnut Stain dauber. The color stuck in the recesses and I wiped it off the surface. That dirtied it up a bit.

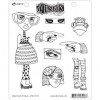
Now, what to put on the background. I pulled out my Dylusions Pondering Petunia stamps that I had to have, and have maybe used once, then stamped the face and the legs onto a piece of Kraft card stock. I fussy-cut them, and then minimally colored them with gel pens. Black for the shoes and lips, purple for the hat's dots, and black & purple for the hair. Yes, it's weird. And yes, I was going for the disembodied look. ;)

I added a strip of card stock to anchor the legs. I drew in the lines (they are crooked, can't you tell?) and added some silver gel pen to the intersections of the lines.

Sentiment. Clueless. I pulled out my Paper Smooches Slang Gang set and used "yo!". I have no idea if that's Steampunk or Hipster, but it's Steampunk now!

That's all I've got, people. Remember to respect your elders, and please don't shun me. I tried.

Oh, a story, sortof related. Almost 20 years ago (maybe only 16 .. which is almost 20), my kids and I were in FL, hanging out at the edge of the pool, trying to stay cool. An older male teen walked by with pierced nipples, and there were chains hooked to the loops in his nipples, and the other end of the chain was somewhere inside his swim trunks.

My kids just watched him walk by, then all three of us soundlessly looked at each other, making "OW OW OW WTH?!" faces. They later said that I don't need to worry about them, as they would never, ever do that themselves. Then they shuddered (I have good kids :)). Now, was that kid's get-up Steampunk? It would make a fun card, eh?

Thanks for stopping by!

Stuff I used: Hero Arts clock background (must be really old - I can't find it on the Hero Arts site), SU Kraft and Basic Black card stock, Hero Arts Metallic Decor - silver, Sakura Bright Colors gel pens, Sakura Glittering gel ink pens, and the following:


SOS #221: Wooden It Be Nice

It's Tuesday, and time for a new challenge at Shopping Our Stash. This week's theme is Wooden It Be Nice, and we'd like you to use wood somewhere on your project. Think: buttons, veneer shapes, wooden paper sheets -- all sorts of options.

I might have over-done it. Here's my card, then I'll explain:


This all started when I looked out my window at my tiny tree whose leaves are turning:


and now for the leaves:


The wheels started turning in my brain. I have wood veneer leaves. I could work with this.

Here's the card again since I've blathered and posted tree pictures:


So I colored some wood veneer leaves with Copics in Red/Orange/Yellow and two greens. I used a piece of wood-ish washi tape behind the leaves to anchor them. I used a piece of A Muse wood-grain card stock in a blue-ish grey. I also discovered a wood veneer sunshine. I also re-discovered some wood-looking Scrabble letter stickers to spell FALL. ALL WOOD, PEOPLE! *puffs out feathers*

I barely remembered I had most of this stuff, so this was a great challenge for me.  Hopefully it will be for you, too! Why not pay along with us at SOS?

Thanks for stopping by!

Stuff I used: A Muse wood grain patterned card stock, washi tape, American Craft Thickers - Mosaic, Copics (YG23, G99, Y18, YR16, R05), wood veneer leaves (I can't find them anywhere online - they're really old), wood veneer sunshine (same deal - really old), Neenah linen card base.

Monday, September 28, 2015

CSSC #8 WINNERS

Thank to everyone who played my last sketch challenge. Here are my winners:

The big winner is Dixie, who entered this card:


I love the colors, the font in the sentiment, and the distressed leaves.

The two runners-up are Judy:


I like the vintage SU image. I used to have that set; don't know if I ever used it. And she used some fiber that might be older than that stamp set. :) The flutterby is cute, even if it is (gah) pink.

and Lindsey:


Great job flipping the sketch! I do love those Snowdudes!

Congratulations, ladies! Feel free to grab your badge from the CSSC Rules & Badges page, and display it proudly on your blog. You've earned it!

And Dixie, please contact me (email in the right side bar), to claim your prize!

I'll be back on the first with a new sketch!

Thanks, again, for your support! xo

Sunday, September 27, 2015

A Holiday Card

The ladies at Jingle Belles have asked us to make a Holiday or Winter card -- something for someone who doesn't celebrate Christmas. One of my friends celebrates the Equinox. That's a tough one to do, but I do have Hanukkah* stamps, so I made this:


I made many of these until I ended up with this version. Let's just say I confirmed I am not a colorer. This version was the least painful.

The menorah was colored with Copics, as were the candles. The flames were stamped in Delicata Gold and clear-embossed. After I'd put the white panel on the grey card base, I said out loud, "just leave it alone", but noooooo, I needed to put something in all that white space. NEEDED to. I added a few Martha Stewart holographic stars.They are very shiny:


I think it's safe to say this will NOT be my Hanukkah card this year. I'll need to design something less fussy. I have until early December to figure it out.

Thanks for stopping by!

PS: My card won a shout-out at Jingle Belles! Whoot!

* Several people have asked me why Hanukkah/Chanukkah is spelled so many different ways. It's because the name is transliterated from the Hebrew word for Hanukkah. Transliterated means something is spelled the way it sounds in its native language. Because the first letter in Hebrew is the CH guttural sound, some people spell it Ch and some just spell it H. It keeps things interesting, and probably aggravates stamp-makers. This Paper Smooches set has both spellings. It also confounds Spell-check.

Stuff I used: Vat of clear embossing powder, Copics (0, C0, C3, C5, B01, BG02, BG07), SU Basic Gray card stock, A Muse gingham card stock, and the following:


Friday, September 25, 2015

Night Skies

During last weekend's crafty play date, I did a lot of sitting around, wondering what to work on. We do that a lot when we get together. There was also a lot of "oooooh, I could maybe ...". Some of it even worked! :) Playing is good, and FUN, especially when the others are just playing, too. You learn by doing.

One of the things on my list to get better at (does that make sense? Let's try again ...) One of the techniques I've been meaning to work on (better?) is night skies. I've played a bit with the powdered pigments, but I'm still not feeling the love. I may be more of a Distress Ink person.

So I used a few Distress inks and blended two backgrounds on water color paper. Why water color? I dunno. Maybe since I had no plan, I thought I might flick it with water.

Here's one of the cards, then I'll explain:


I had the two colored backgrounds done, and was pondering what to do with them. My pal at the next table was squeeing, a lot. Turns out she was using Viva Glitter Paste, which is embossing paste with glitter in it. I'm not big on glitter, but I thought it would look cool for stars. I found my other pal's stencils, grabbed the Simon Says Stamp Falling Stars stencil, and applied the glitter paste. Very cool!

Here it is up close and personal:


I like that the ink colors show through the stars.

For the other background, I used plain old boring pearlescent embossing paste:


and a close-up, because I can:


It's still very cool, but in a different way. And they are opaque.

So I had two UFOs to take home with me. Earlier this week, I got a clue as to what to do with them. I thought a black cat on a wall, looking at the sky would be nice, so that's what I did. I used the Impression Obsession Distressed Brick background stamp and originally stamped it in Schoolhouse Red. Blech. So I cleaned the stamp and stamped it again in Simon Says Stamp Smoke ink. Apparently I hadn't cleaned off all the red ink (red is so pesky!), but I kinda like the result.

I cut the background into pieces and put a strip onto each of the sky panels.  I stamped the cats in black on a remnant of white card stock and cut them out. I sat them on top of the brick walls using foam tape.

You may notice the first card has a much smaller white border than the second one. That's because I suffered from a bit of "cut your own bangs" syndrome. Every time I trimmed  bit off one side of the panel, I'd notice the other side was still bigger, so I'd trim that one a bit. Repeat, over and over. Sigh.

I finally mounted the two panels onto Hero Arts note cards. One of the few times you'll see me use purple.

Wow, three total cards from an 8-hour stampy session. Kinda sad. I'll see if any of my other UFOs from the session are usable, and I'll be sure to share. :)

Thanks for stopping by!

Stuff I used: I linked below to the Viva Decor Holo Iridescent paste, but I'm pretty sure my pal's paste was clear.